
商城项目后端
一篇随手记,记录开发过程中遇到的问题。
项目介绍
项目地址:https://github.com/dropsong/tiny-shop
对应的前端代码:https://github.com/dropsong/tiny-shop-front
通过 Vue + Django REST framework 实现一个电商平台。
此教学项目的完成方式:前端、资源图片等已经准备好了,我负责后端的开发。
权限和认证采用 Authentication 用户认证设置,动态设置 Permission、Authentication,Validators 实现字段验证。
序列化和表单验证使用 Serializer、ModelSerializer,动态设置 Serializer.
实现了支付、登录、注册功能。
- Json Web Token 方式登录,单点登录
- 手机注册 / 支付宝支付
- 第三方账户微博登录
View 实现 REST API
- ApiView / GenericView 方式实现 API 接口
- ViewSet 和 Router 方式实现 API 接口和 URL 配置
- Django_filter、SearchFilter、OrderFilter 分页
商品分类、商品详情、导航栏、热销列表、收藏功能、用户个人中心、个人资料修改、用户留言功能、收获地址功能、购物车、订单管理、首页轮播图。
Django REST framework 部分源码阅读。
后台开发文档自动化生成及管理 / 通过 redis 实现缓存。
为实现数据分析的需要,统计了商品点击数、收藏数、库存与销量等。
Throttling 对用户和 IP 进行限速,实现反爬虫。
Sentry 完成线上系统的错误日志的监控和告警。
环境准备
前端
为什么前端可以独立开发?
- 前端会自己启动一个简单的 web 服务器,监听端口例如 8080,来渲染前端代码。
- 若前端需要数据,可以通过 axios 发送异步请求给后端。
- Mockjs 可以根据 json 格式生成一些随机数据。
单页面和多页面对比(前端相关):
https://juejin.cn/post/6844903512107663368
前后端分离的开发方式可以大致分为两种:
- 前端没开发好。这时后端开发就会省事一点,可以在 drf 提供的测试页面测试。
- 前端开发好了。这时候后端就要配合前端,将前端跑起来,每开发一个接口,就简单测试一个接口。
如何运行一个 vue 项目?
在 vscode 中安装推荐插件,安装 node 和 npm.
安装 nvm 以管理版本,注意在命令行安装 nvm 时梯子换成虚拟网卡模式,或者在 hosts 文件中追加内容。
注意要使用匹配的 node 版本。
问题: node-sass 可能无法找到适合当前环境(Linux 64-bit with Node.js 12.x)的绑定文件。
解决方法: npm rebuild node-sass
后端
系统:debian12
数据库:mysql Ver 8.4.4 for Linux on x86_64 (MySQL Community Server - GPL)
注意,在 debian 上需要先卸载 MariaDB,否则会产生冲突。
使用的第三方:
- DjangoUeditor
这个 DjangoUeditor 版本众多,多数已经过时了,与 Django 4.2 不兼容。我改动了一点代码,使这个项目可以运行,但也许还有其他潜在的错误。 - social-core
- djangorestframework-simplejwt
rest_framework_jwt 已经不再维护,故迁移到此。
导入数据
迁移之后根据模型类生成数据库的表。
在 ./db_tools/data 下有一些数据,我们用 ./db_tools 下的 import_category_data.py 和 import_goods_data.py 两个脚本导入。
若导入数据出错,需要清空一些含有外键或者自关联的表,可以执行:
1 | set foreign_key_checks = 0; |
CORS 跨源资源共享
一个清晰的介绍视频:
在项目中安装也很方便:
1 | pip install django-cors-headers |
此外,在后端代码中还需要一些额外的配置,具体参阅 settings.py 中相关注释。
如何在 debian 的 chrome 上禁用安全模式,允许跨域,方便开发?
首先,找到 chrome:
1 | which google-chrome |
在对应目录下,执行:
1 | google-chrome --disable-web-security --user-data-dir="/tmp/chrome_dev_profile" |
用户登录和手机注册
Token 认证登录
本小节对 token 的使用作简单演示。
在 settings.py 中:
1 | INSTALLED_APPS = [ |
然后在 ./urls.py 中:
1 | from rest_framework.authtoken import views # 用于理解 token |
在 postman 中:
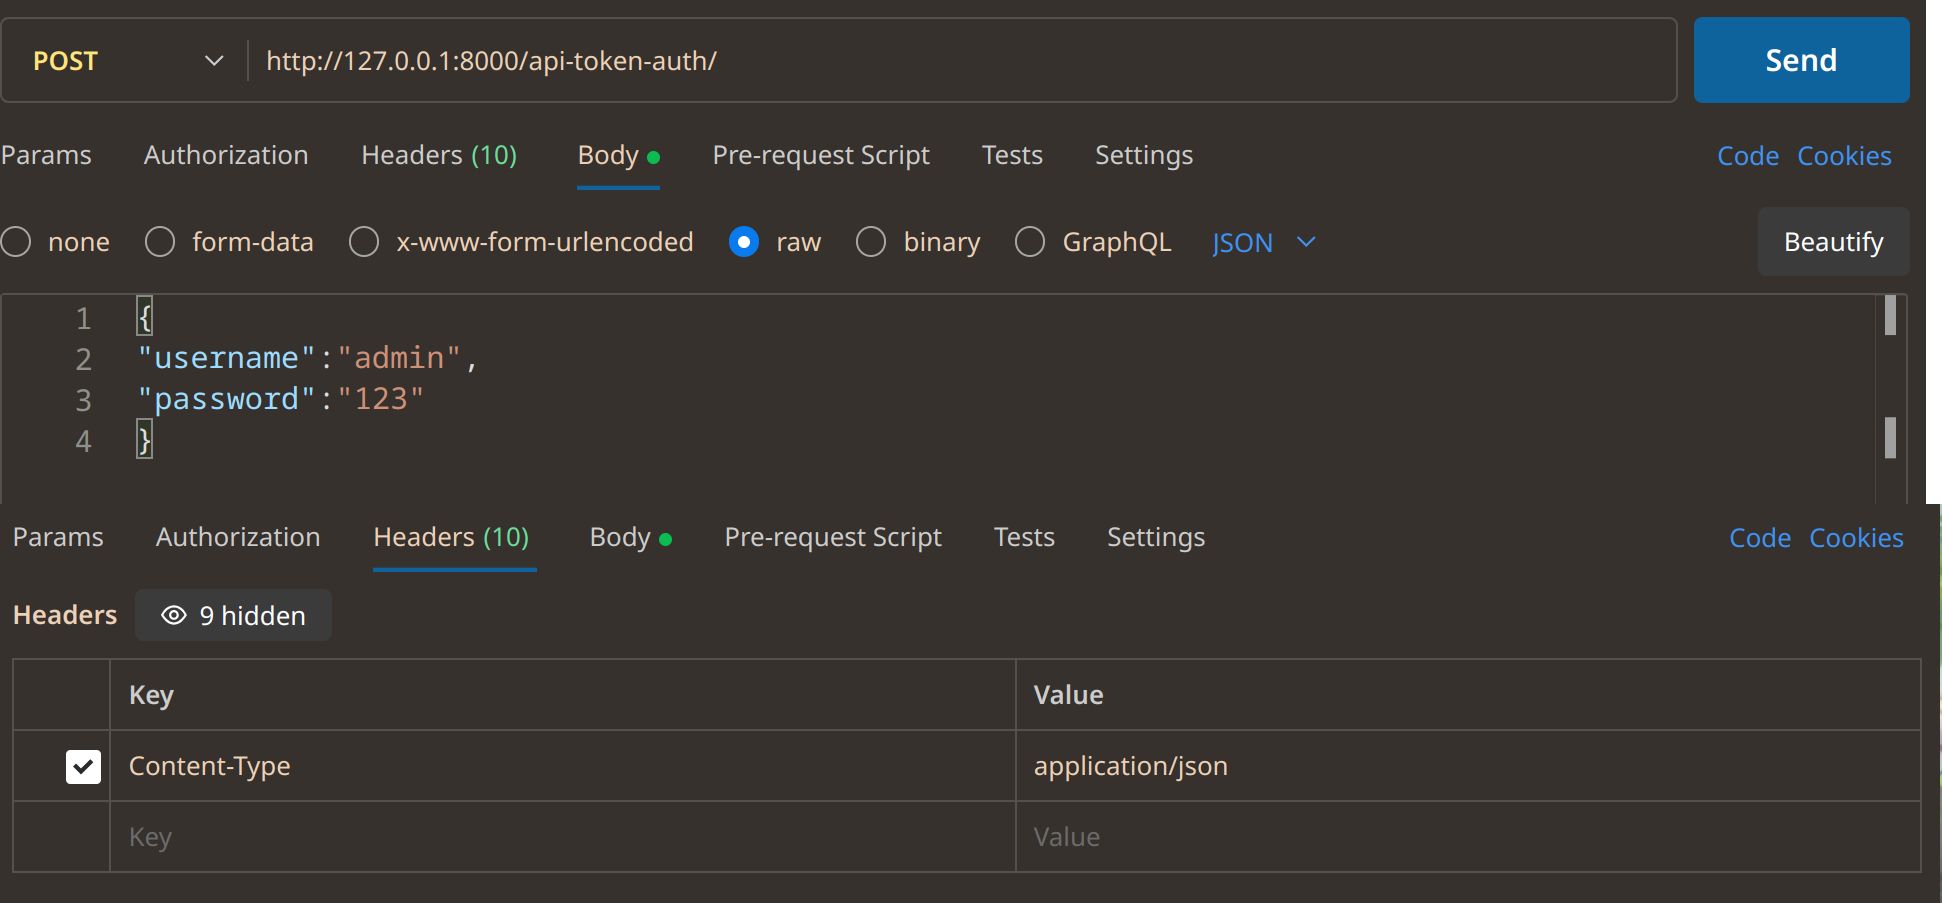
得到结果:

这个 token 也可以在后端的数据库中找到。
也可以使用如下命令生成 token :
1 | python3 manage.py drf_create_token -r admin |
注意这样会覆盖原先的 token 值。
现在做实验进一步理解 token. 启用 vscode 的调试,将断点打在下图位置(即 class GoodsListViewSet(viewsets.ReadOnlyModelViewSet) 点进去)。注意要在配置文件中设置 "justMyCode": false .
1 | { |


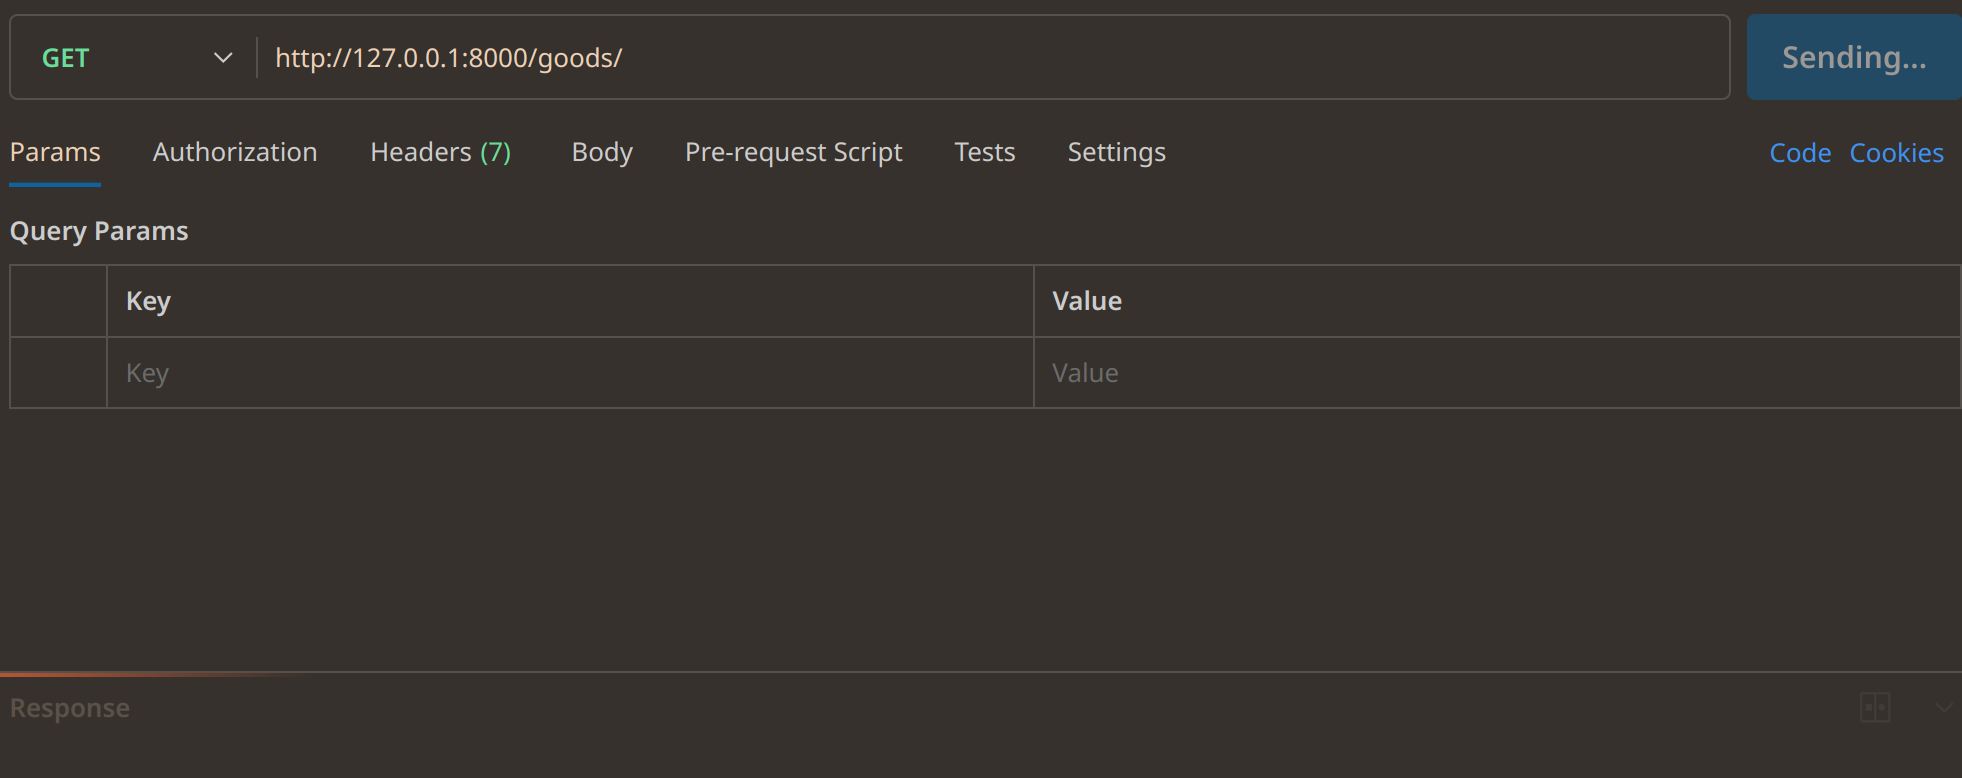
此时用 postman 发送如下请求也会卡住:
在 postman 中的 Headers 中加上 token 就可以看到:
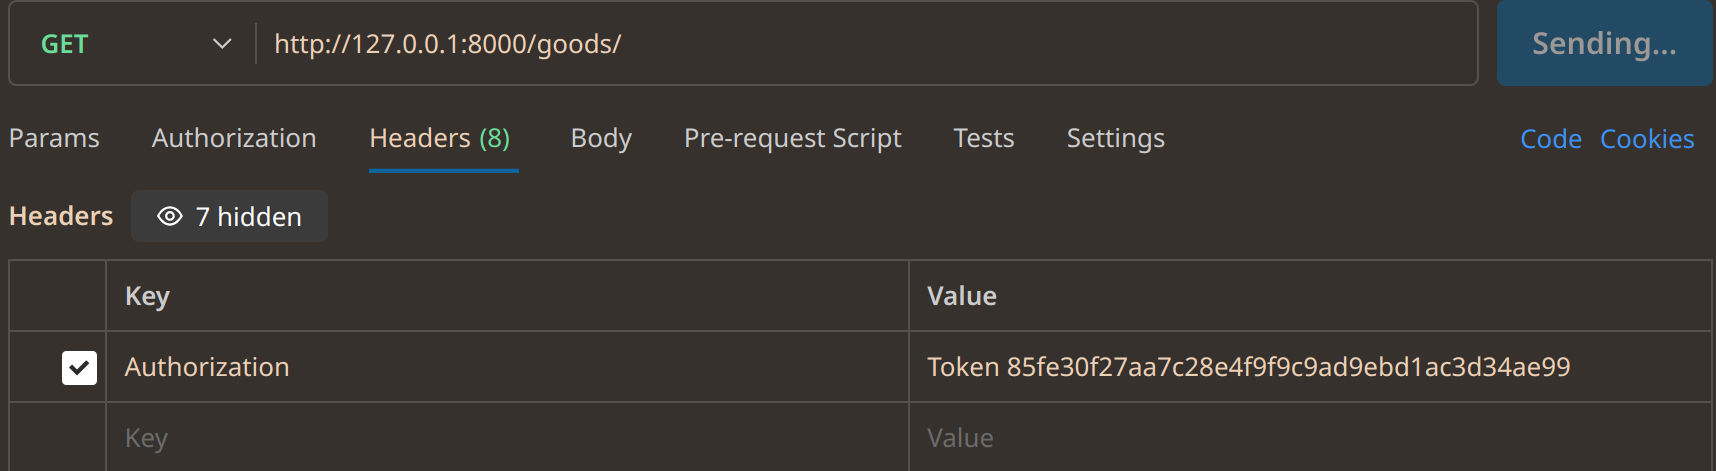
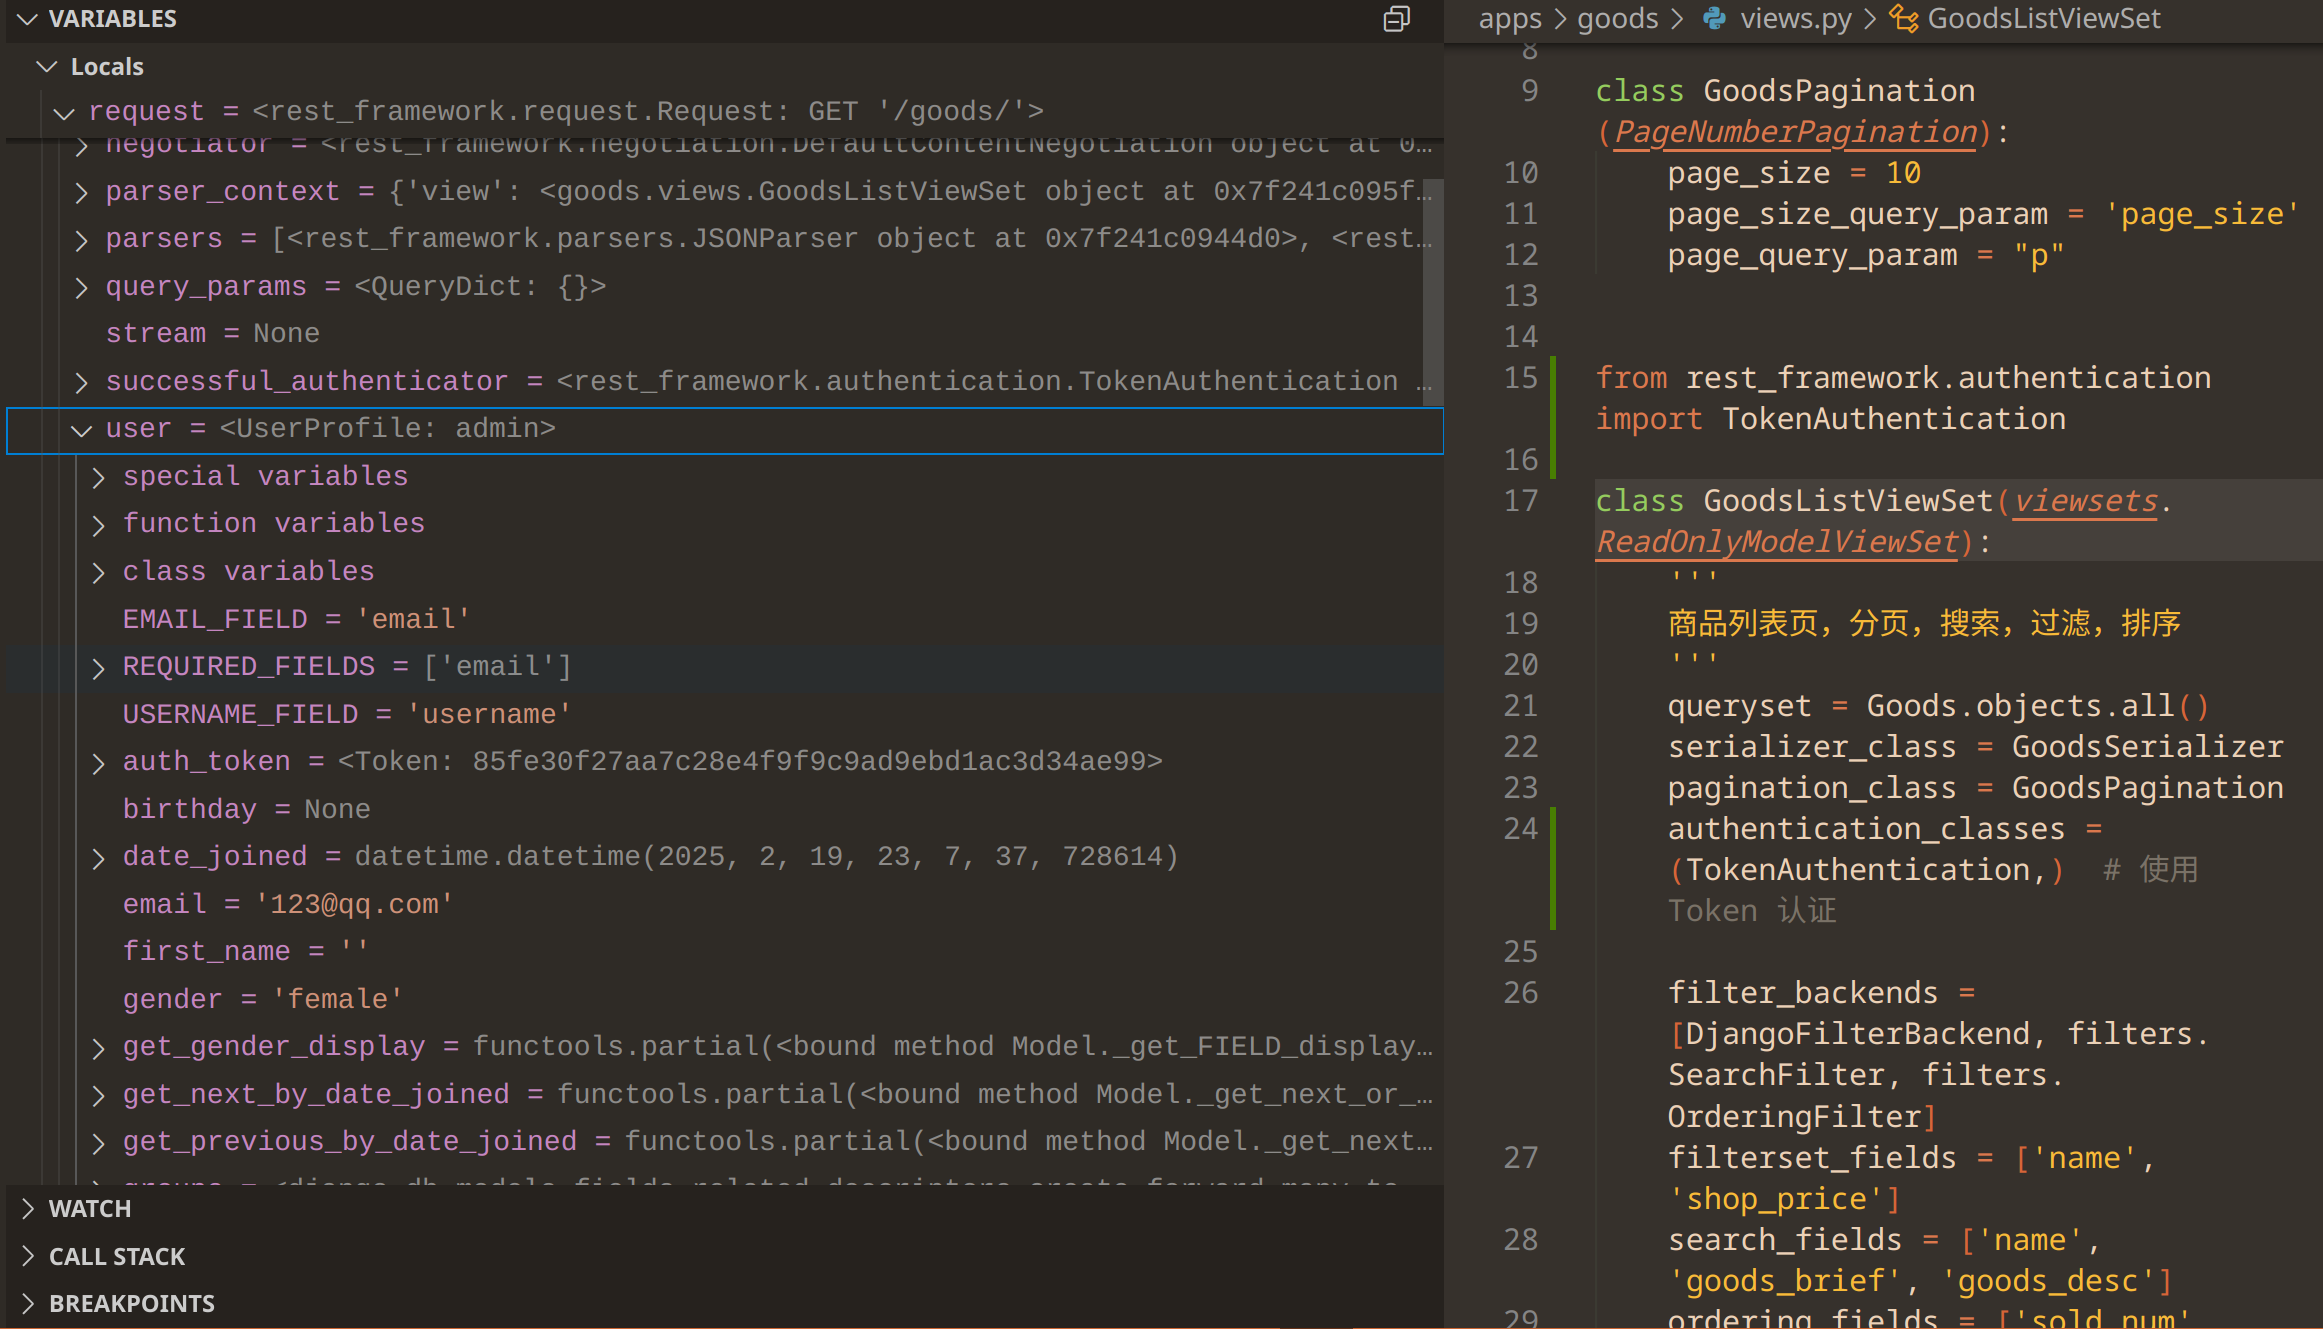
说明此时根据 token 辨认出了用户。
JWT Token
注意,在和前端联调时,不能登录 django 自带的管理后台。
基础知识和配置
简要介绍:
- 所有的服务器都有一把解密的钥匙,用户登录时,将用户的信息通过加密算法加密得到密文,这个密文就是 JWT Token.
- https://www.cnblogs.com/wenqiangit/p/9592132.html (已在 https://archive.org/ 备份)
- (推荐)Cookie、Session、Token究竟区别在哪?如何进行身份认证,保持用户登录状态?
在 ./urls.py 中:
1 | from rest_framework_simplejwt.views import TokenObtainPairView, TokenRefreshView |
然后在 settings 中配置:
1 | import datetime |
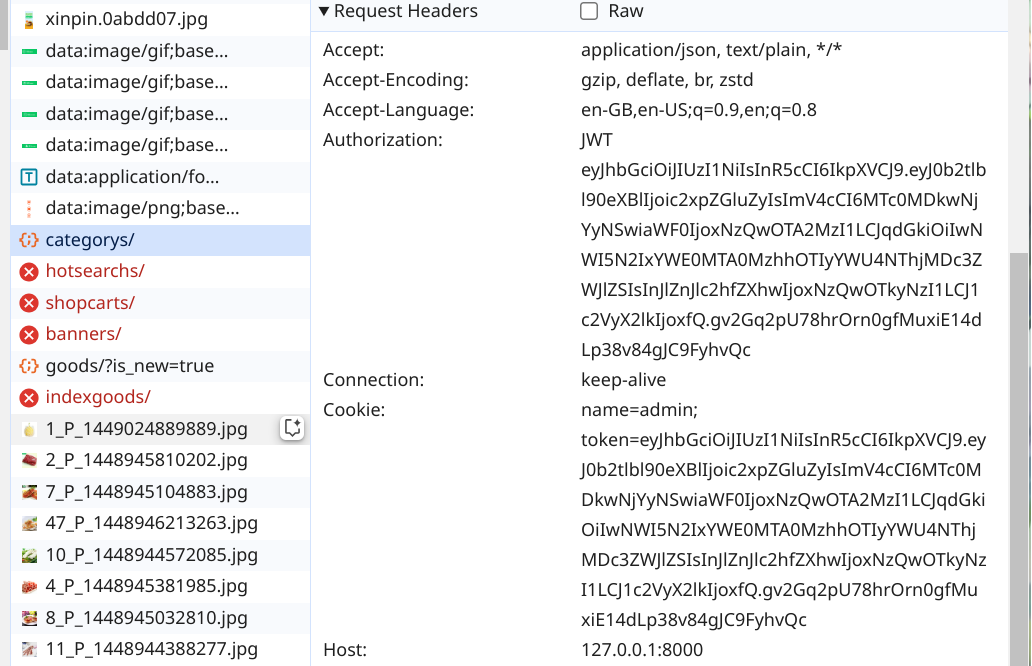
通过 postman 发送请求:
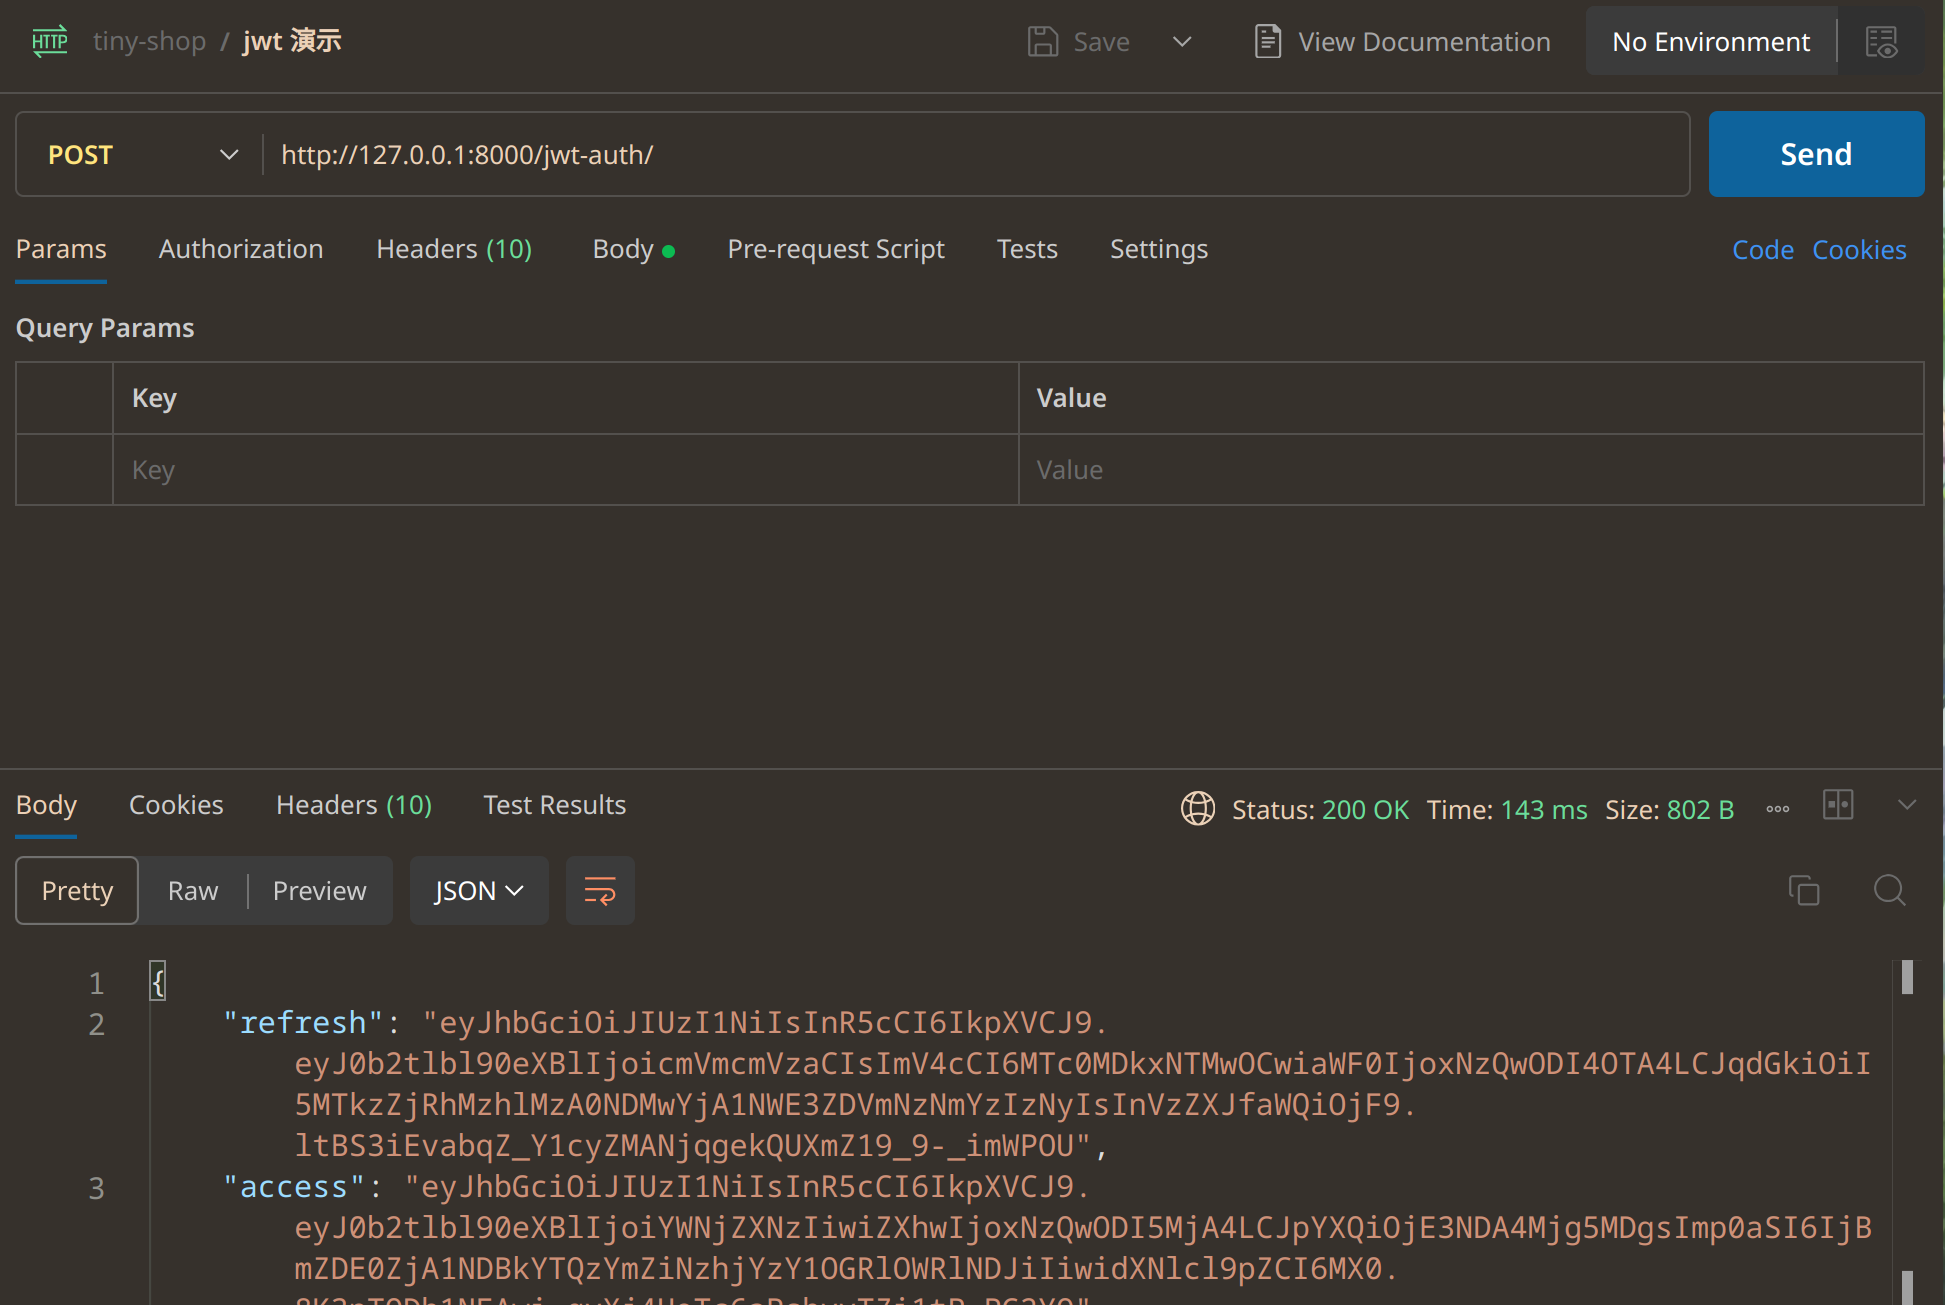
实际上,将图片中的响应全丢给 AI 分析完全没问题(这个项目本就是我写着练习的,token 放出来无所谓)。
1 | { |
refresh Token:
- 类型:刷新 token
- 用途:用于刷新访问 token。
access Token:
- 类型:访问 token
- 用途:用于访问受保护的 API 或资源。
这两个 token 通常一起使用:access token 用于短期认证,过期后可以用 refresh token 获取新的 access token。
签名的目的:
最后一步签名的过程,实际上是对头部以及负载内容进行签名,防止内容被窜改。如果有人对头部以及负载的内容解码之后进行修改,再进行编码,最后加上之前的签名组合形成新的JWT的话,那么服务器端会判断出新的头部和负载形成的签名和JWT附带上的签名是不一样的。如果要对新的头部和负载进行签名,在不知道服务器加密时用的密钥的话,得出来的签名也是不一样的。
信息暴露:
在这里大家一定会问一个问题:Base64 是一种编码,是可逆的,那么我的信息不就被暴露了吗?
是的。所以,在 JWT 中,不应该在负载里面加入任何敏感的数据。在上面的例子中,我们传输的是用户的 User ID。这个值实际上不是什么敏感内容,一般情况下被知道也是安全的。但是像密码这样的内容就不能被放在 JWT 中了。如果将用户的密码放在了 JWT 中,那么怀有恶意的第三方通过 Base64 解码就能很快地知道你的密码了。
因此 JWT 适合用于向Web应用传递一些非敏感信息。 JWT 还经常用于设计用户认证和授权系统,甚至实现 Web 应用的单点登录。
实验 - access 和 refresh
如果 access token 过期,可以用 refresh token 刷新(若 refresh token 未过期)。
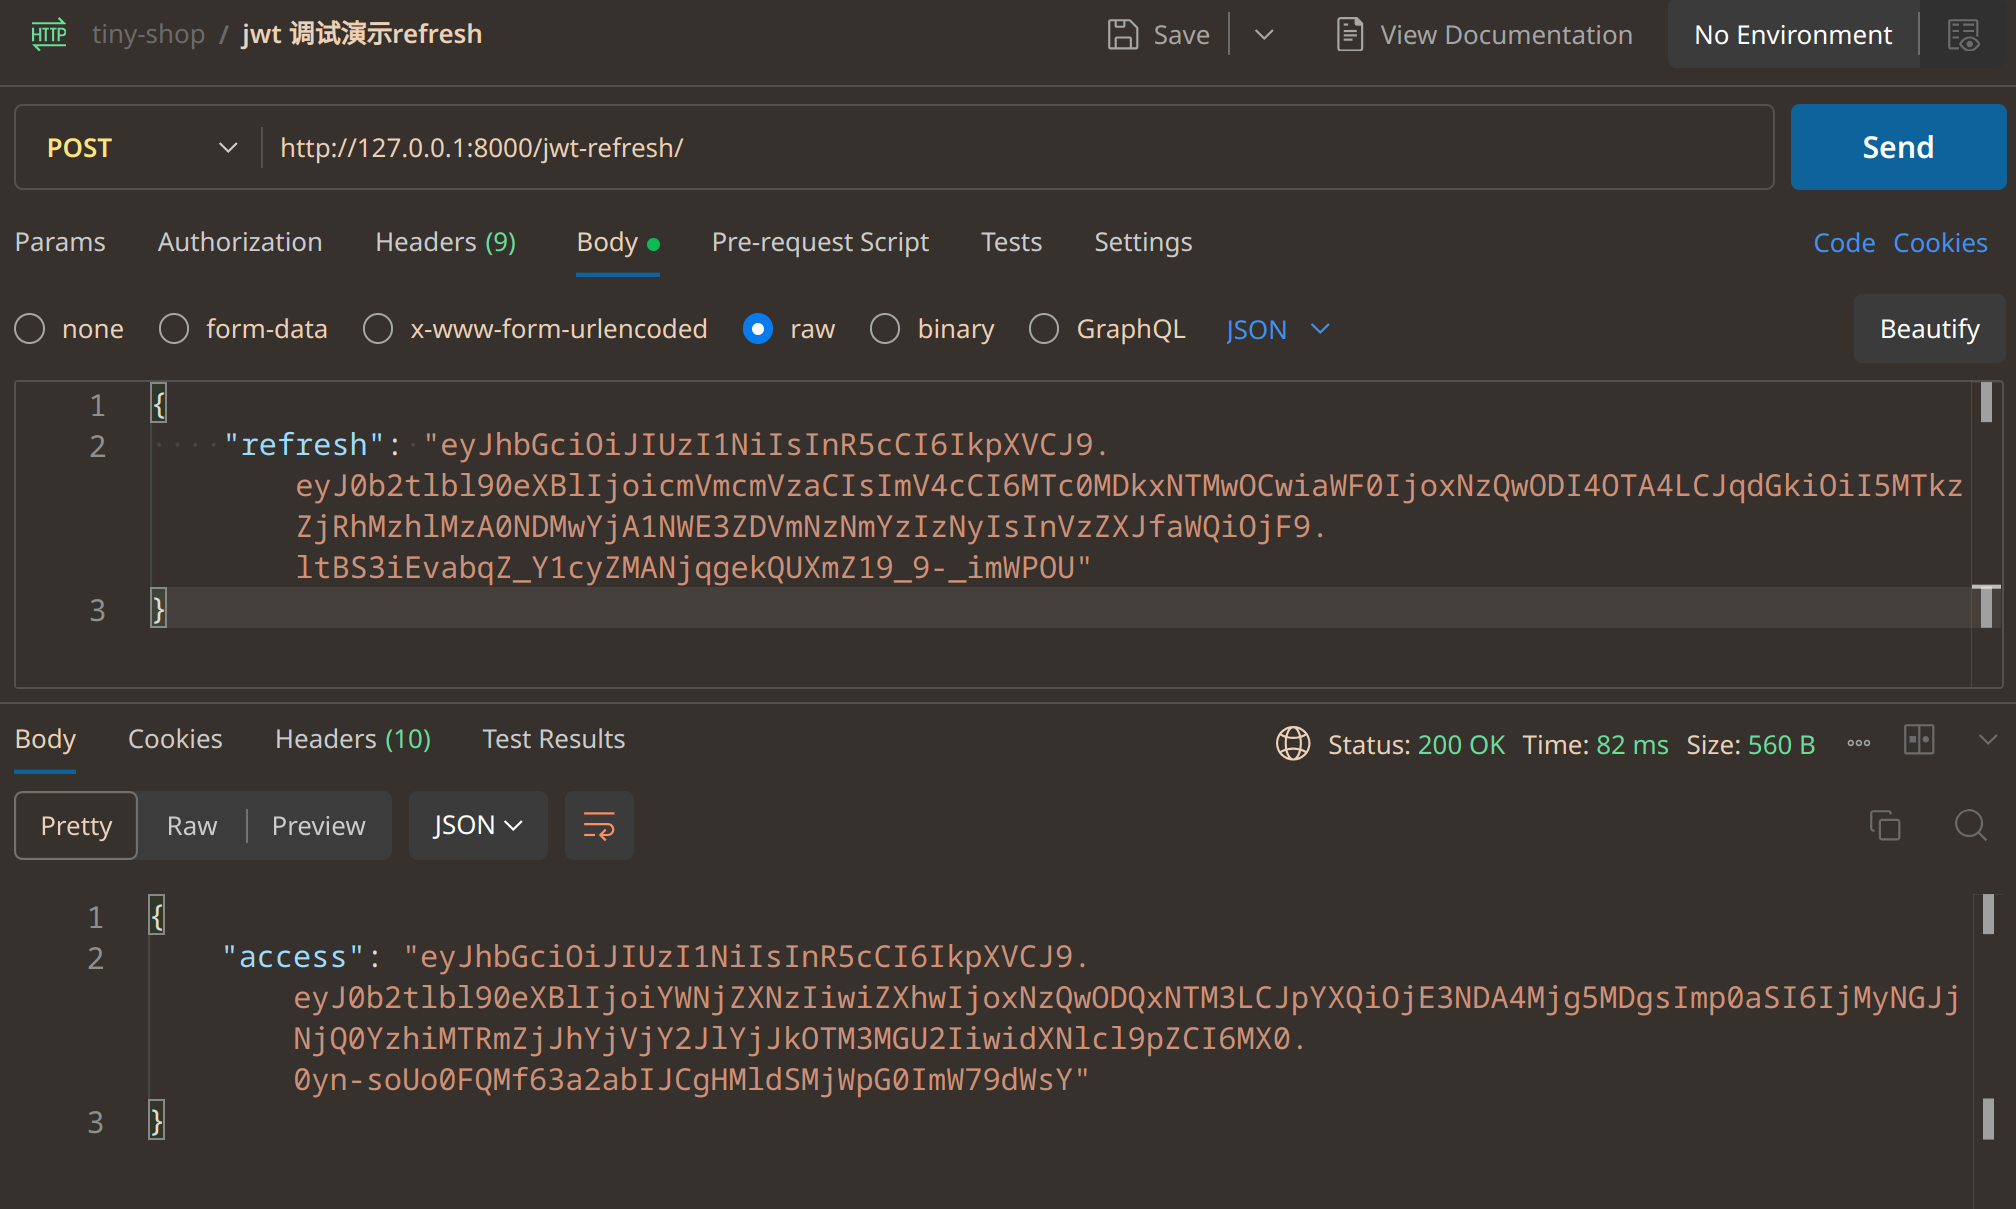
如果 refresh token 也过期或无效,会返回错误(这个时候就需要用户重新登录了?)。
将返回的新的 access token 复制下来,用于后续请求。
接下来使用 access token 访问受保护资源。
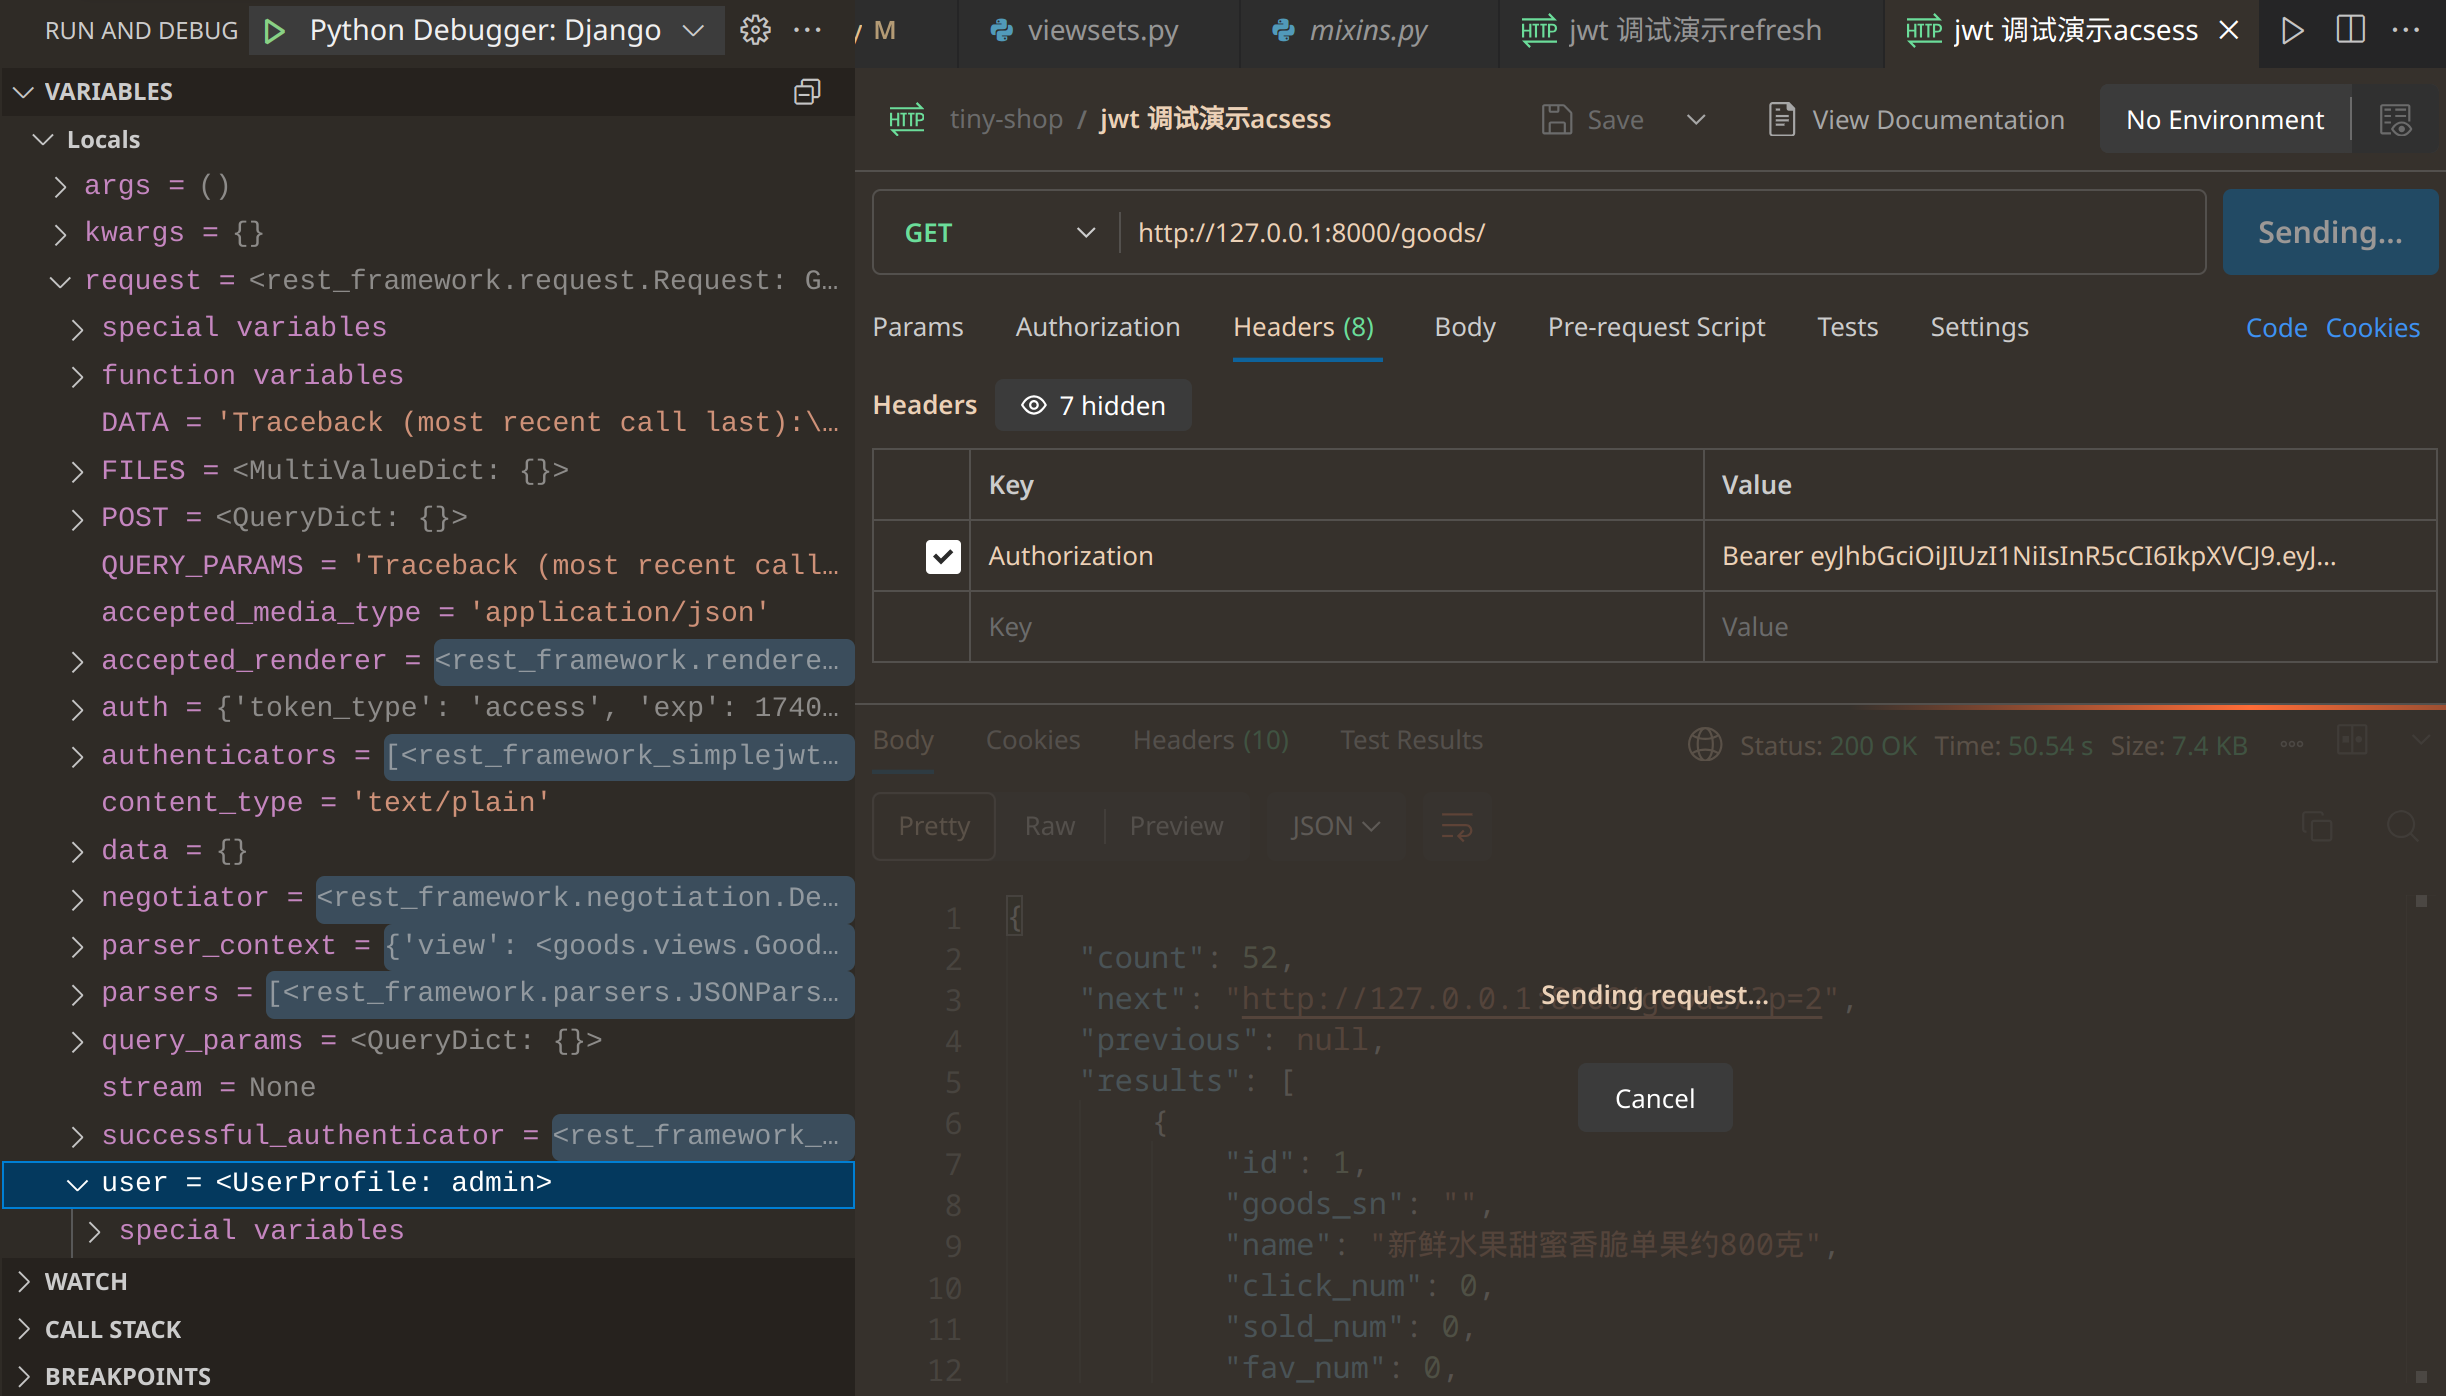
在打断点的调试实验中,我们看到服务器识别出了用户。点击继续,postman 得到了正确的响应数据。
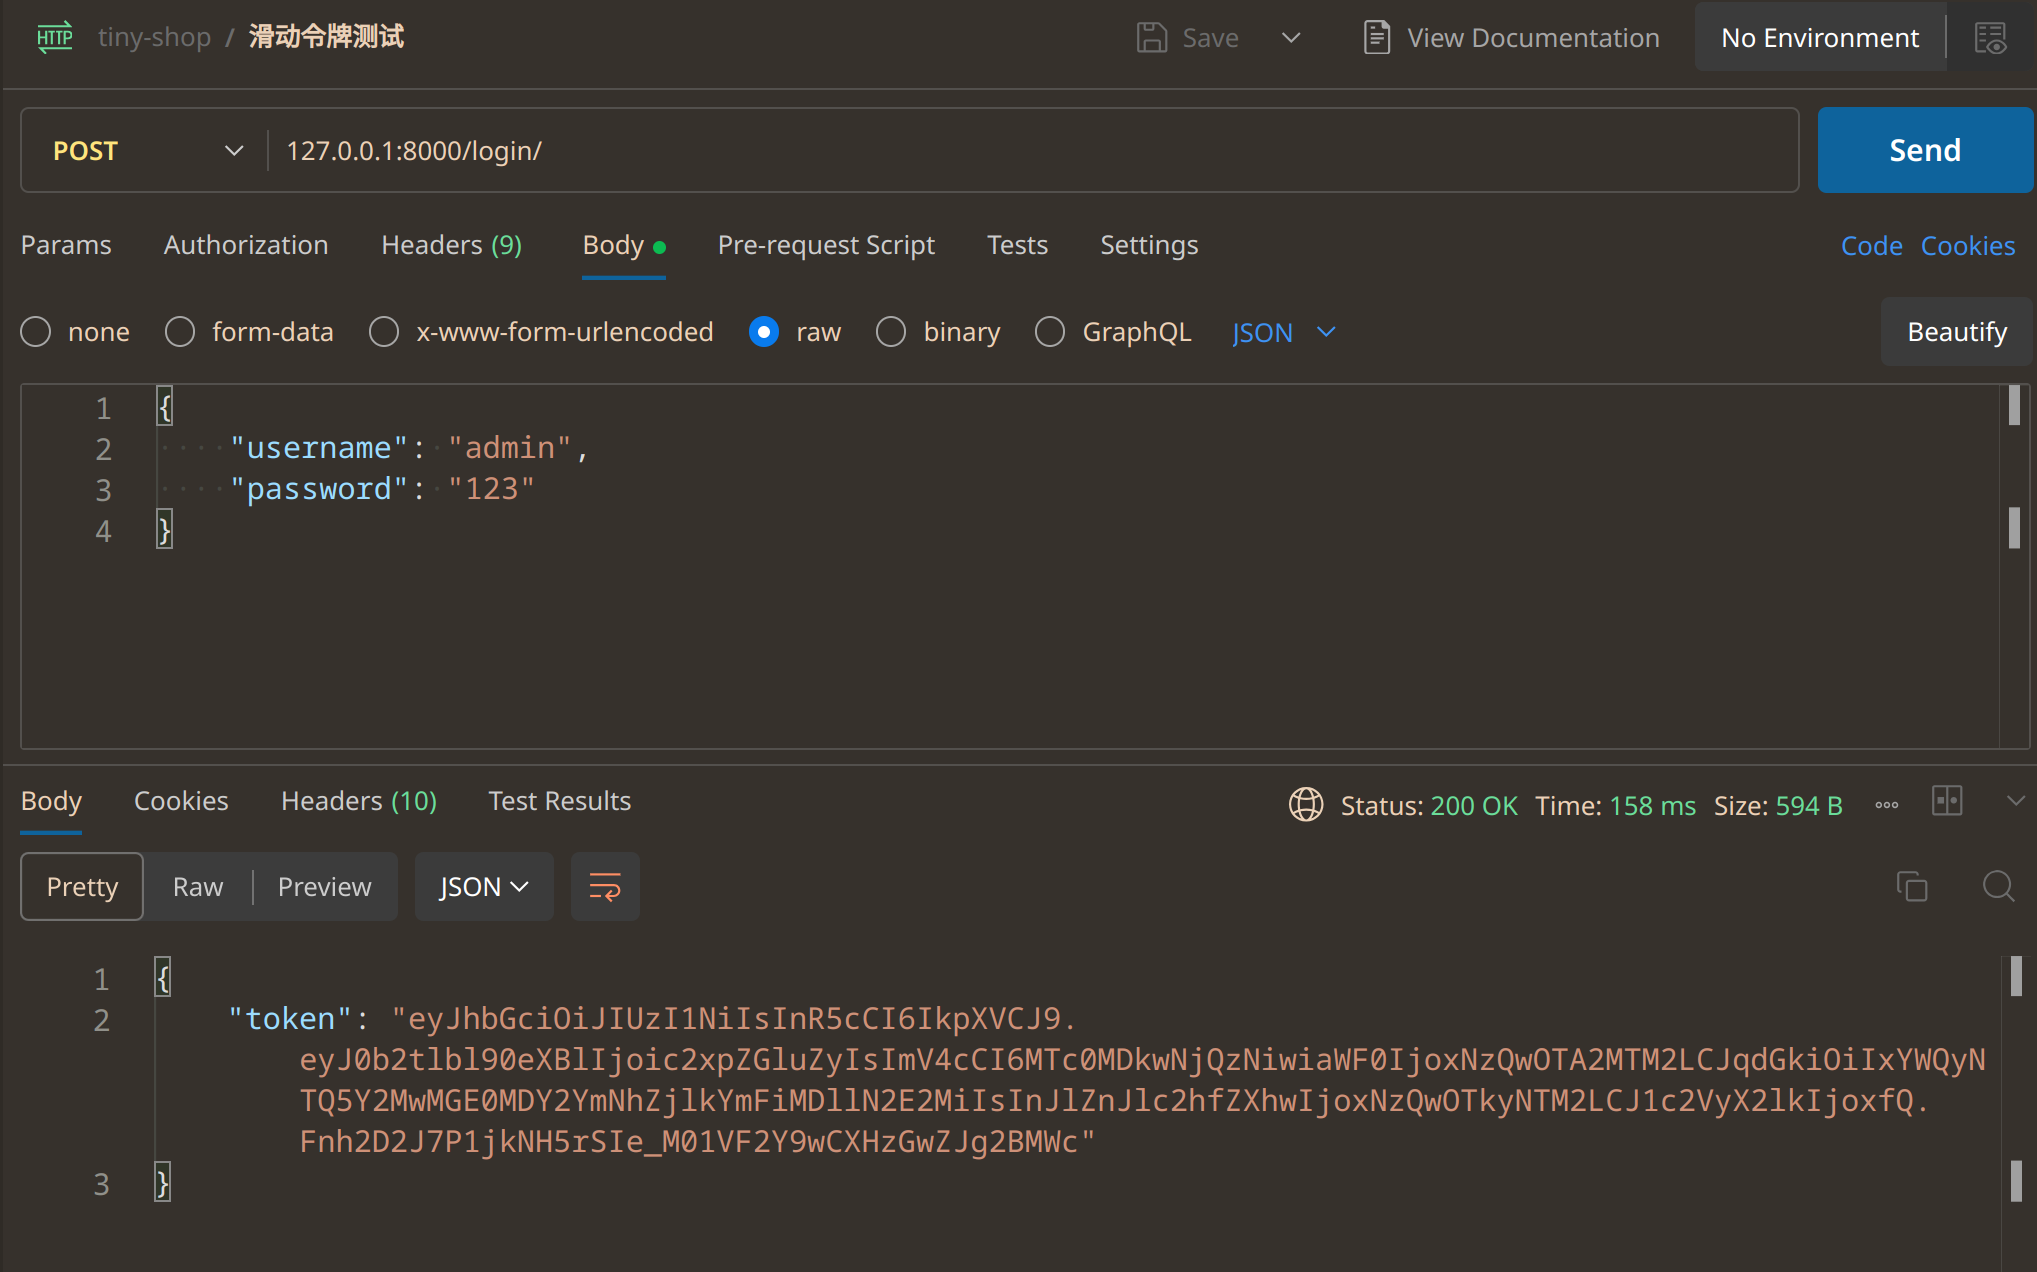
实验 - Sliding Token
然而使用 access 和 refresh 对这个项目还是麻烦了点,我们使用滑动令牌(Sliding Token)。
官方文档:
Sliding tokens offer a more convenient experience to users of tokens with the trade-offs of being less secure and, in the case that the blacklist app is being used, less performant. A sliding token is one which contains both an expiration claim and a refresh expiration claim. As long as the timestamp in a sliding token’s expiration claim has not passed, it can be used to prove authentication. Additionally, as long as the timestamp in its refresh expiration claim has not passed, it may also be submitted to a refresh view to get another copy of itself with a renewed expiration claim.
在 ./urls.py 中:
1 | from rest_framework_simplejwt.views import TokenObtainSlidingView |
在 postman 中测试:
在前端测试效果,发现登录之后,可以识别登录用户的身份:
注意,这个令牌是会刷新的。具体机制上网搜。
手机号登录
现在想要实现这样的功能:用户不仅可以以用户名登录,也可以以手机号登录。
向数据库中的 admin 用户赋一个电话号码。
在 settings 中增加:
1 | AUTHENTICATION_BACKENDS = ( |
然后在 ./apps/users/views.py 中:
1 | from django.contrib.auth.backends import ModelBackend |
即可实现手机号登录。
手机号注册
首先我们需要一个帮助发验证码的网站,让短信提供商发验证码。
一个例子是云片网,这类网站审核比较严格,需要实名认证,发送的短信也必须是审核后的模板(里面留一个验证码的位置)。发送短信的样例代码在 ./apps/utils/yunpian.py .
相关逻辑在 ./apps/users/serializers.py, ./apps/users/views.py, ./ShopProj/urls.py 中。
登录后端 http://127.0.0.1:8000/users/,提示 GET 方法不允许。我们在下面 post 一个错误的数据,会提示验证码错误。
在 users_verifycode 表中手工填入用户和验证码数据(也就是这里直接在数据库里填了个假的),再次 post,成功。且在后端数据库 users_userprofile 中,看到刚刚新增的用户。
在开发过程中,遇到一个实际的问题:注册之后,浏览器 F12 看不到 token 和 name. 实际上注册之后并没有登录,若想要登录,需要仿照登录的返回数据格式。为此我作了一些修改,见 ./apps/users/views.py 中 class UserViewset 的注释。
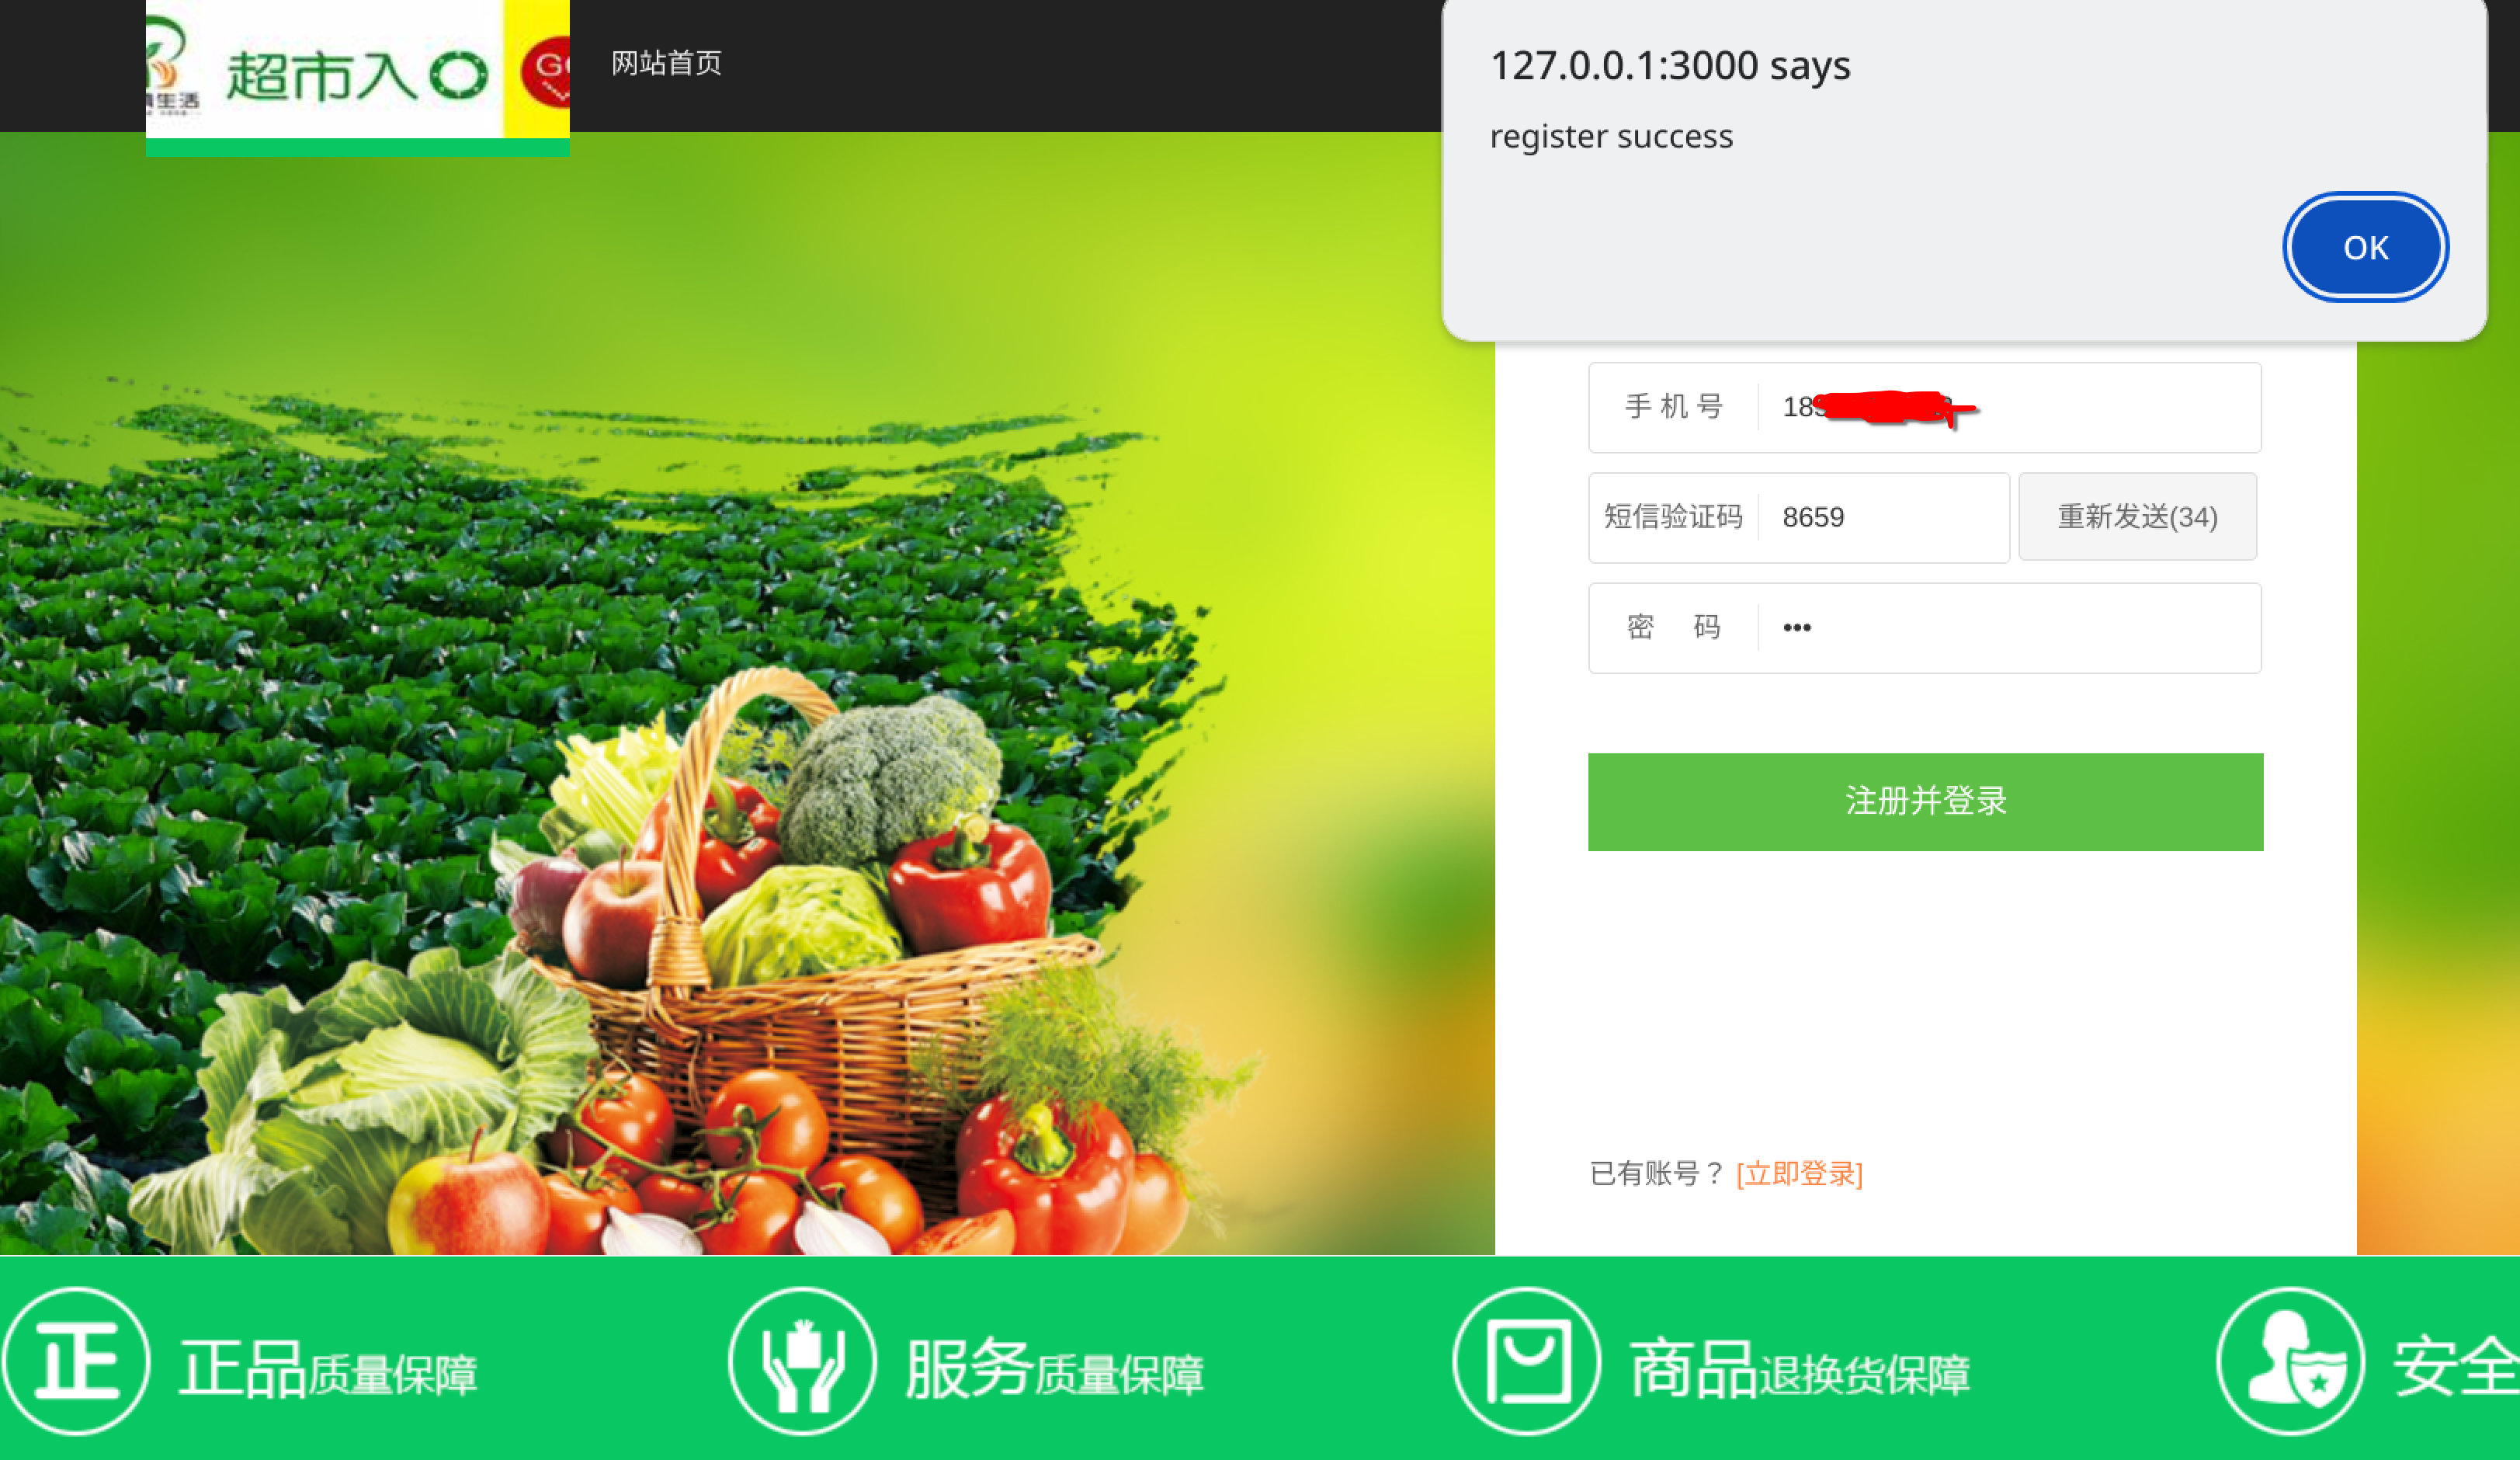
刚才的实验是在数据库中填了一个测试用的假验证码,接下来完成一个实际的验证码发送。相关代码在 ./apps/users/serializers.py 中的类 SmsSerializer、./apps/users/views.py 中的类 SmsCodeViewset.
测试成功:
问题排查-文档生成
记录一次问题排查过程。
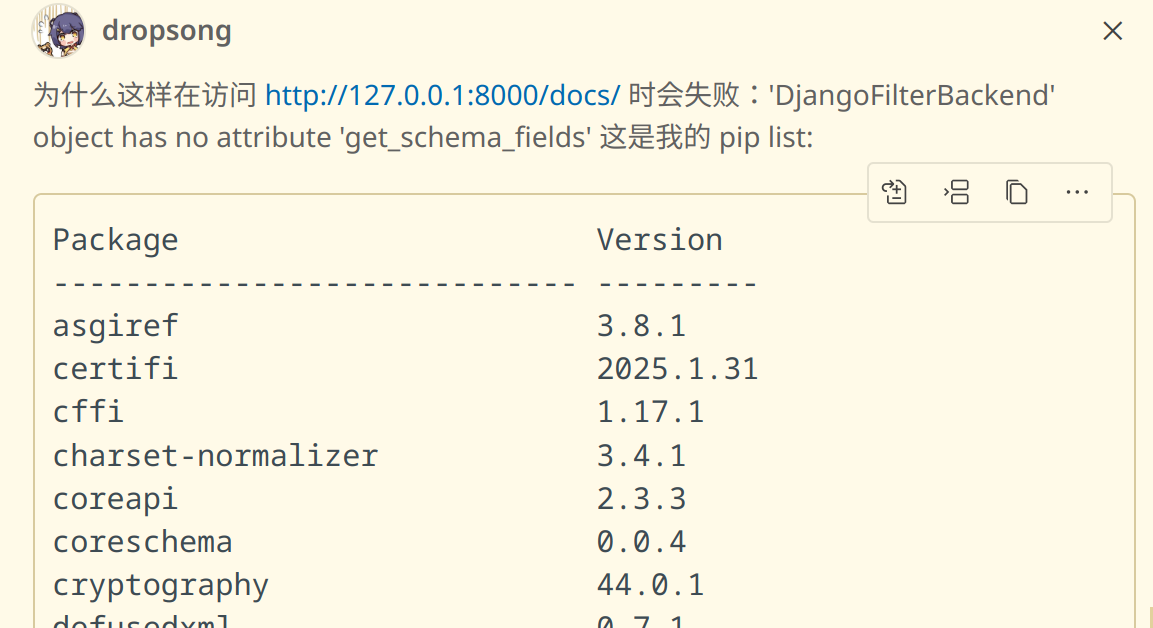
本想使用 drf 的 api 文档自动生成,但是遇到了一些问题。推测是版本不兼容的问题,将报错丢给 AI:
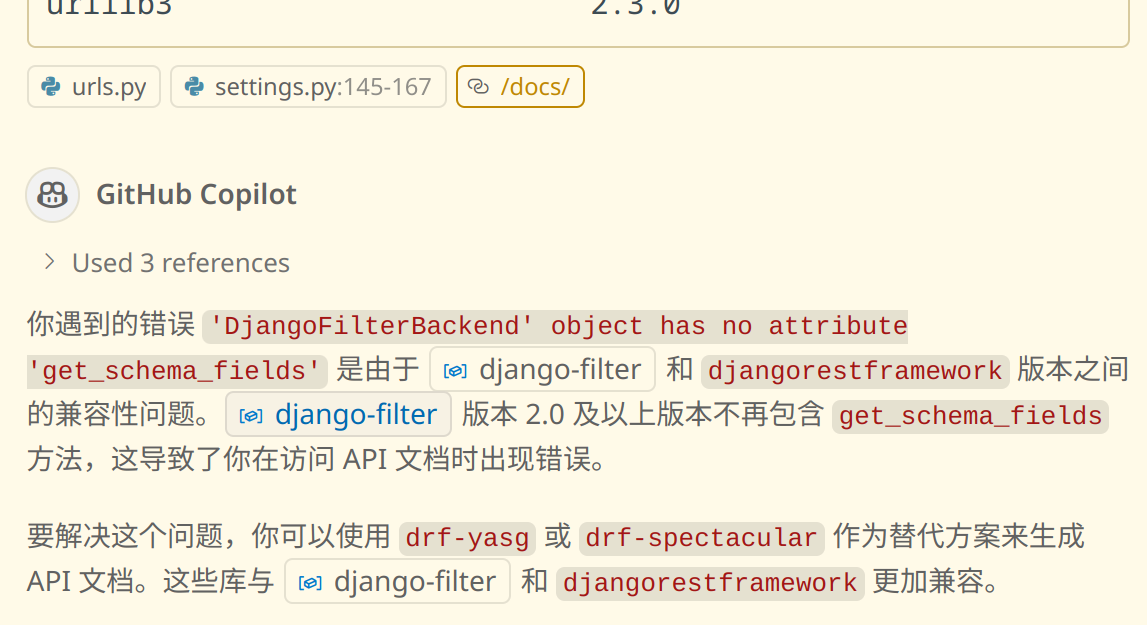
按照 AI 给的建议:
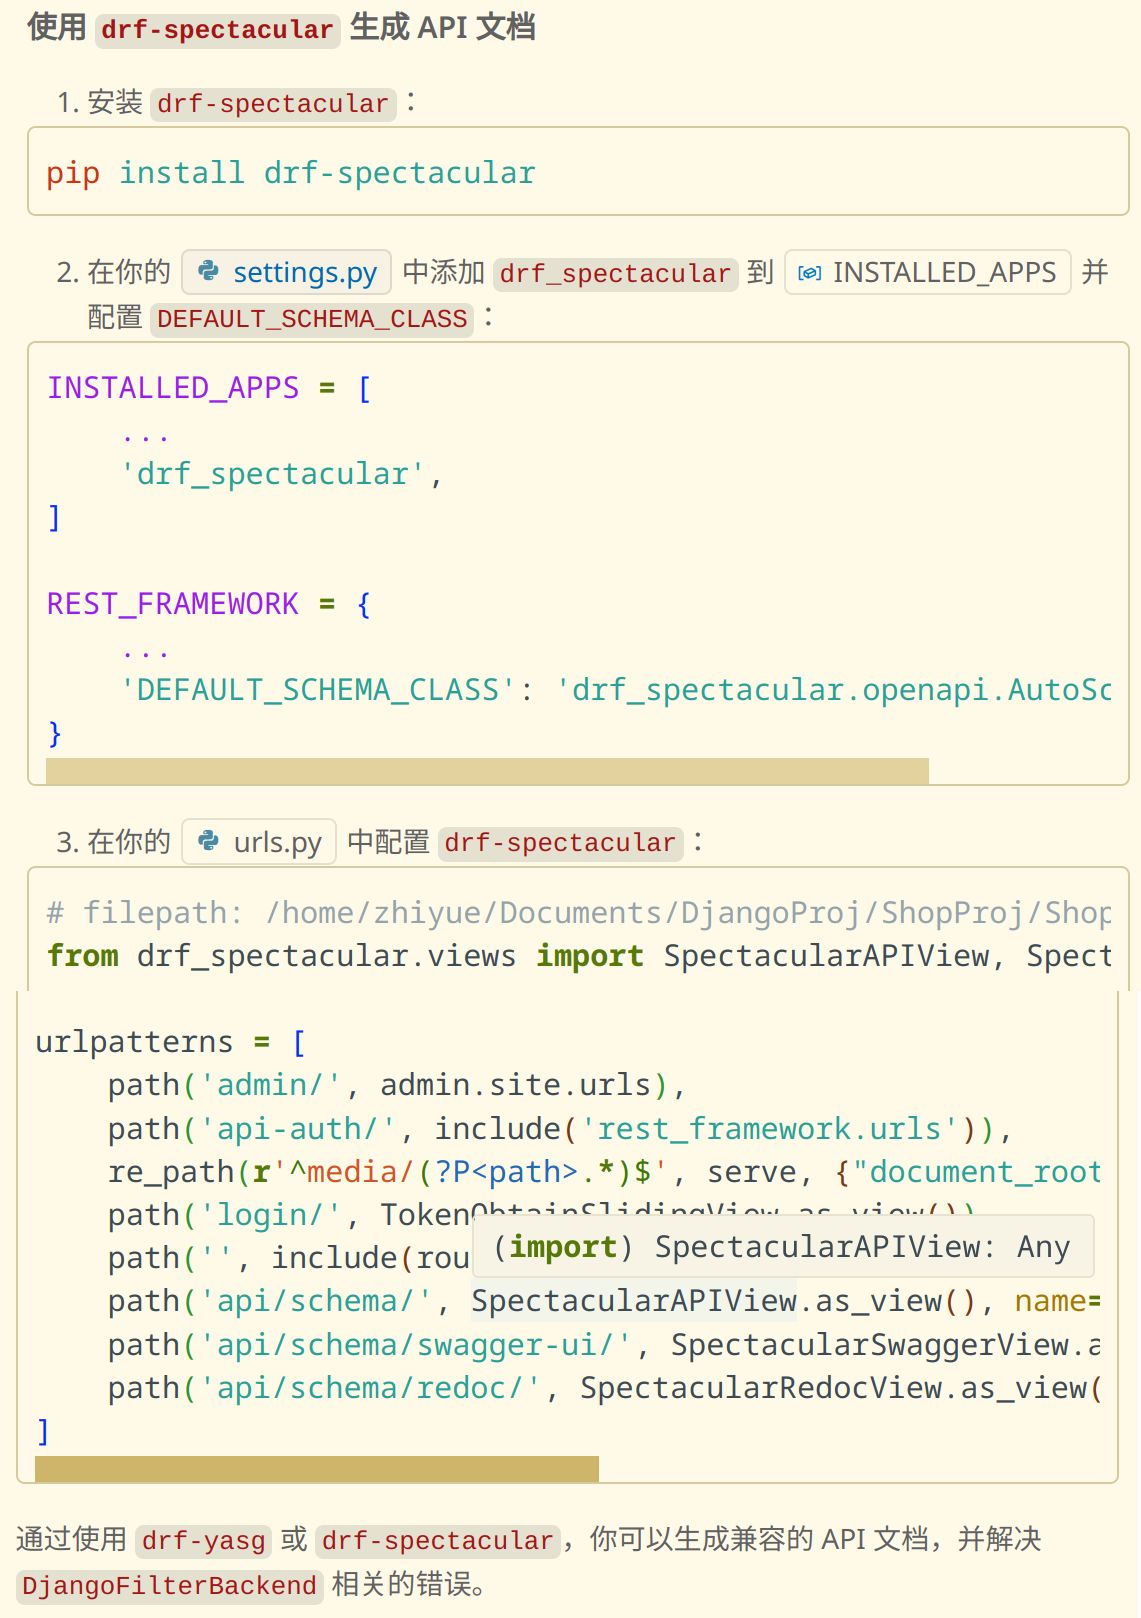
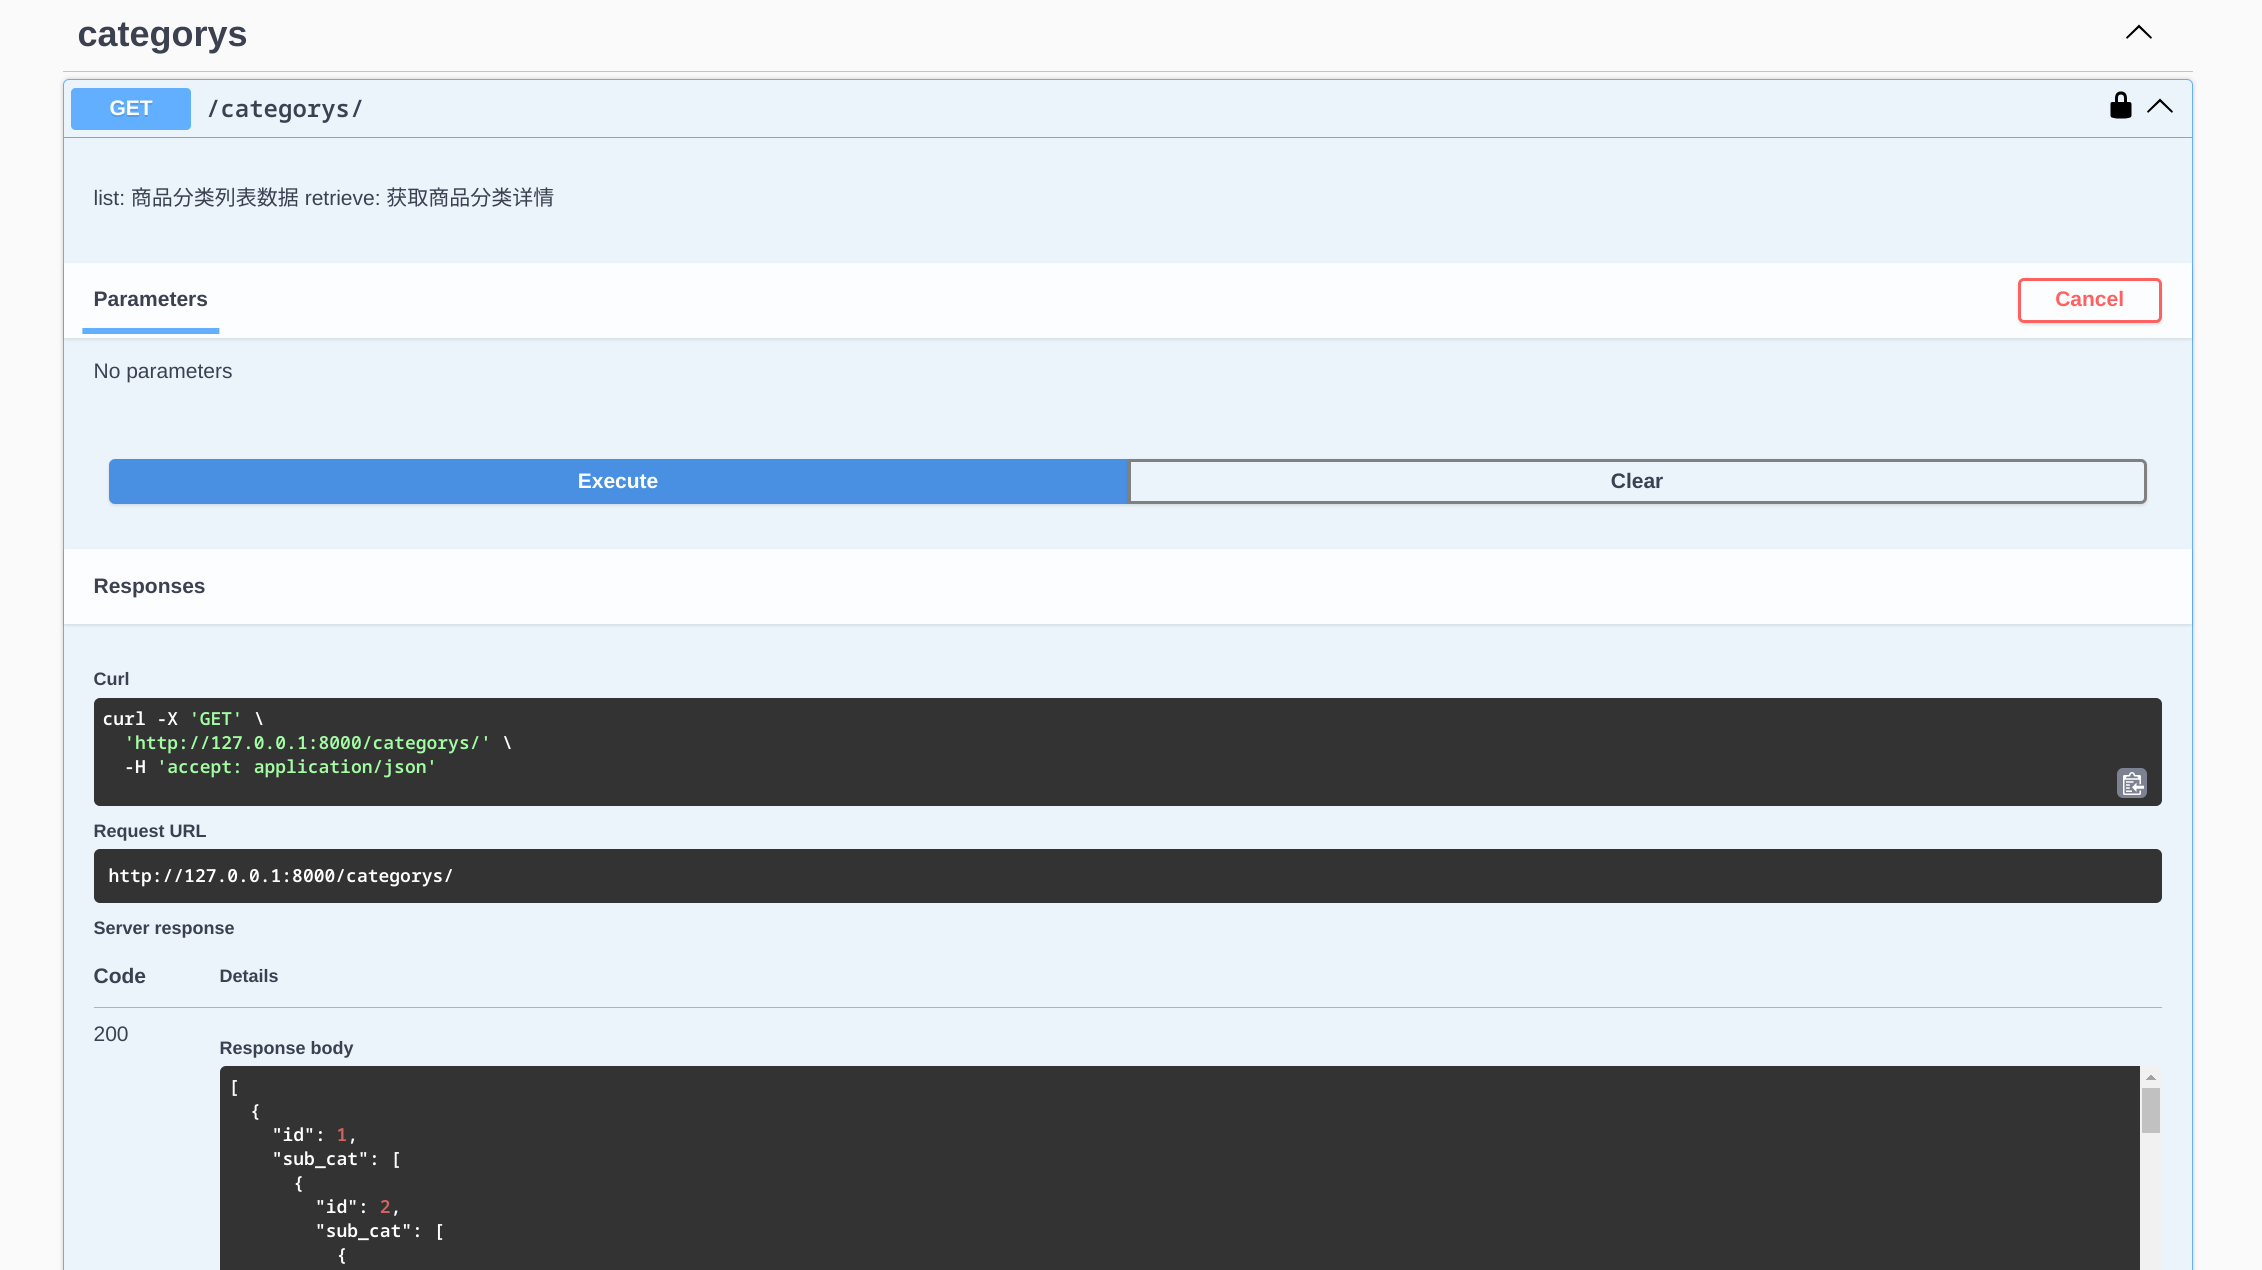
操作,得到效果如下:
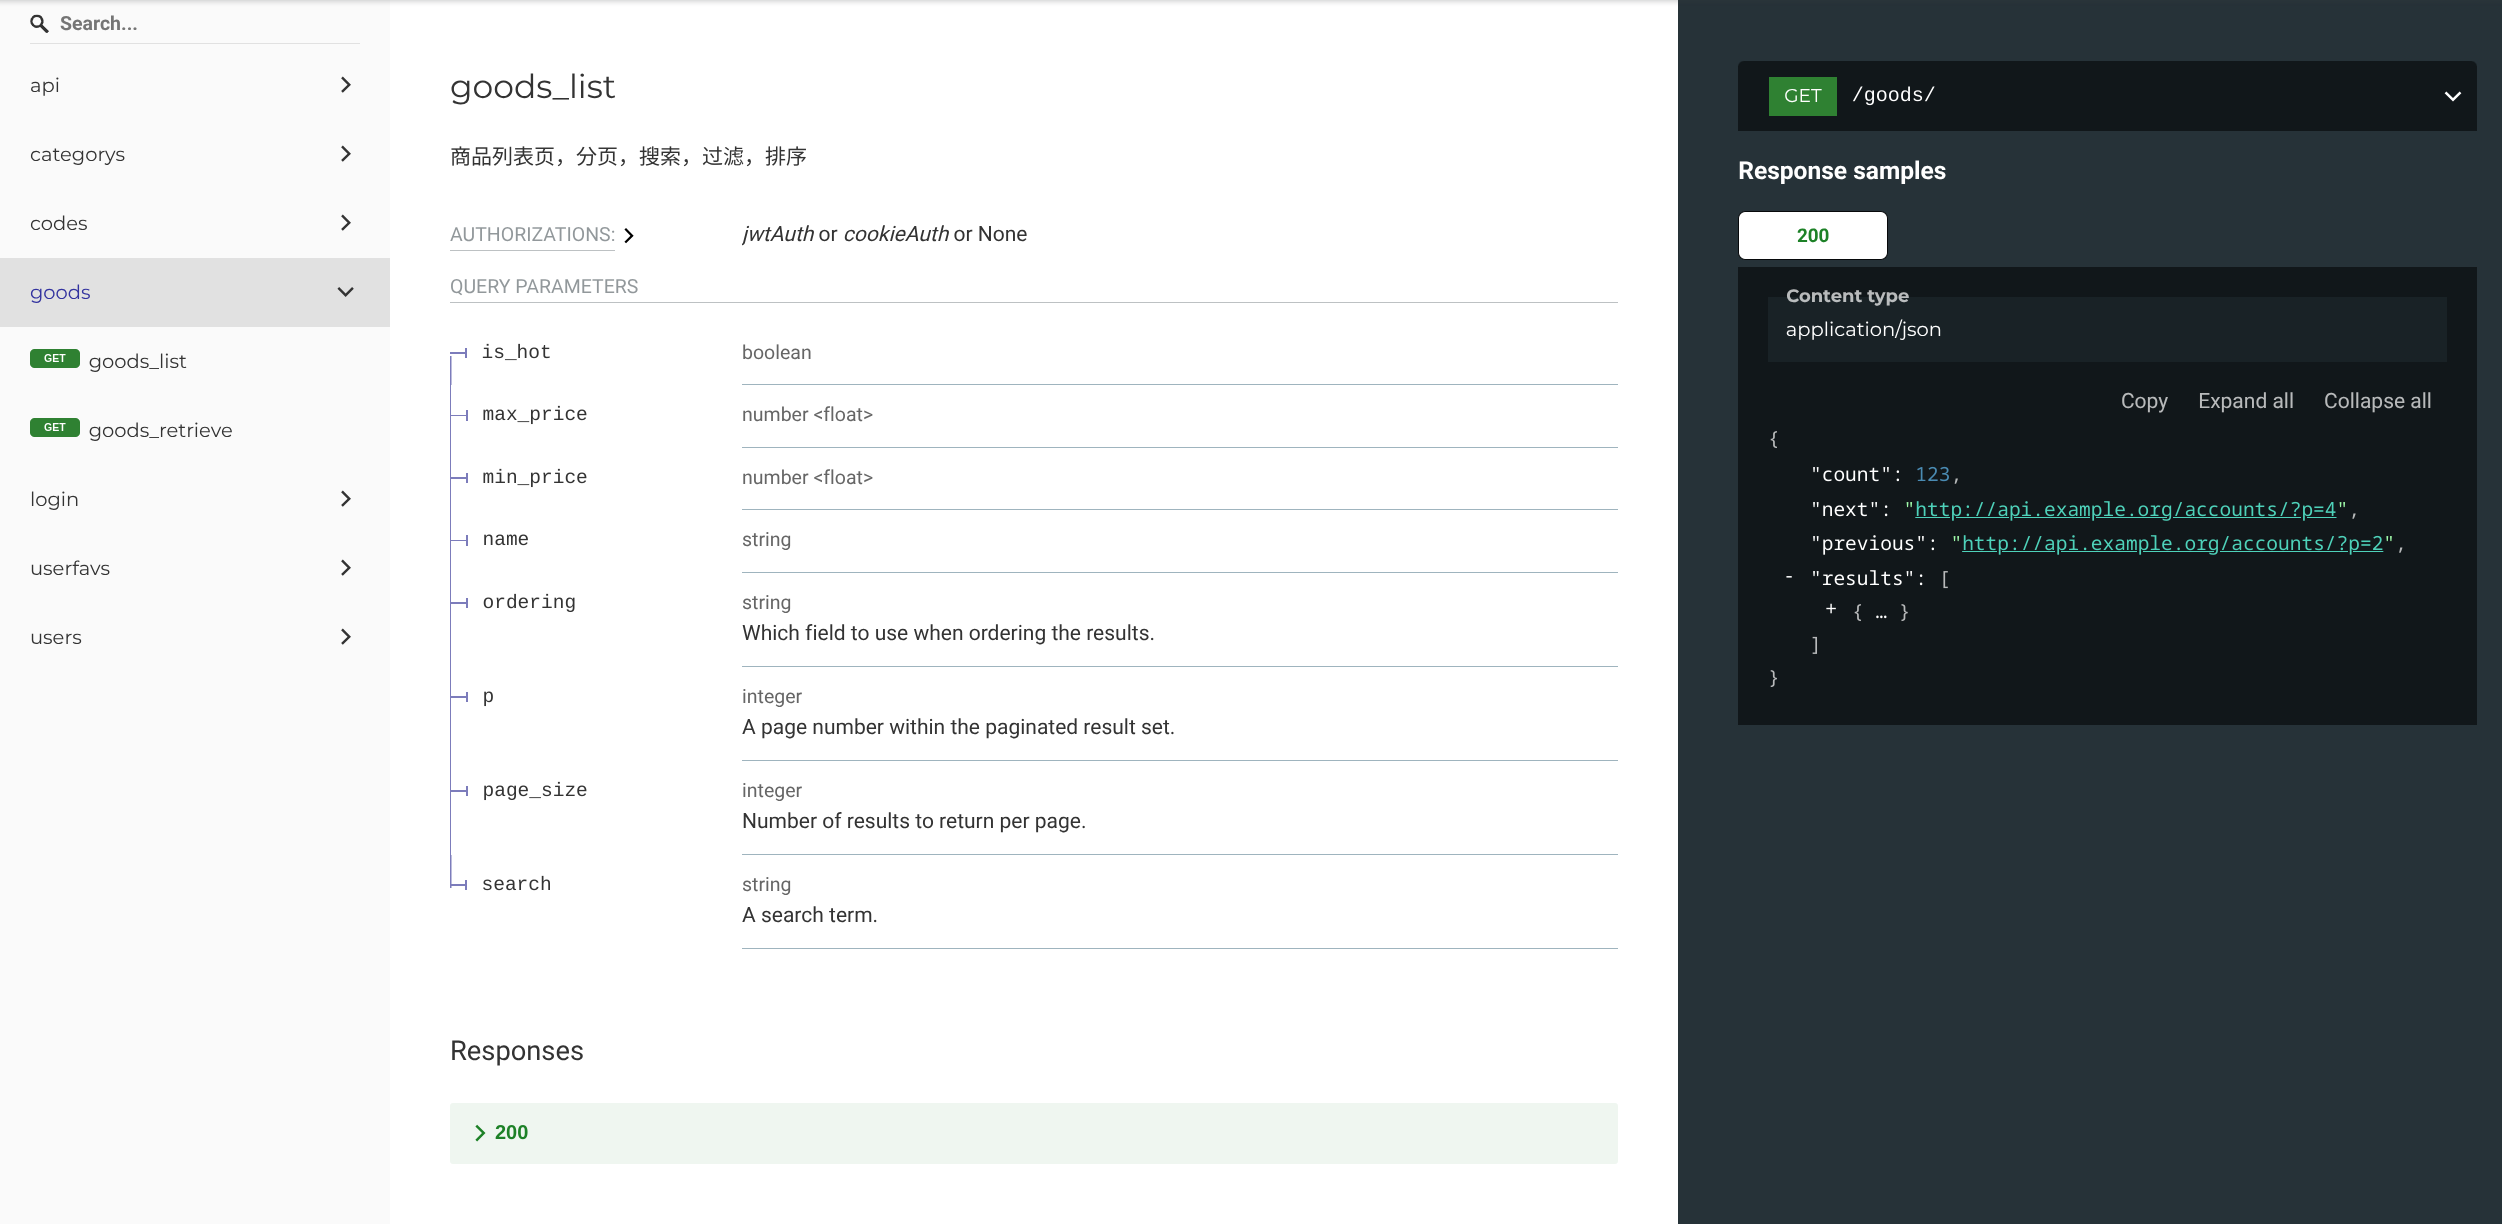
虽然实际上没觉得这东西很好用就是了,之前实习的时候都是用的 ApiFox.
问题排查-认证
遇到一个经典问题,相关的讨论还挺多的:
- https://stackoverflow.com/questions/59771853/anonymoususer-when-logged-with-simplejwt
- https://github.com/jazzband/djangorestframework-simplejwt/issues/562
- https://groups.google.com/g/django-rest-framework/c/YvWiNNCmk8o
一个可能比较靠谱的描述(上面第二个链接,我并不能验证其真实性):
…but JWTauthentication does not populate the request.user object attribute hence I get AnonymousUser, but when i access the django admin it works because request.user is populated by the ‘django.contrib.auth.middleware.AuthenticationMiddleware’
这个问题还是挺棘手的,可能是 djangorestframework_simplejwt 本身的问题。我的解决方案比较原始,仅举一例:
1 | def get_queryset(self): |
相关的代码在 ./apps/utils/diyfunc.py 中。
Azure 云服务器
服务器相关
为使用支付宝支付(沙箱模拟),需要公网 IP.
在阿里云购买一台 ECS 云服务器,选择合适的操作系统(这里我选了 debian),配置安全组、密钥对,使用 vscode SSH 连接时,注意 .pem 文件的权限要求严格,不能随便给很多权限。
在云服务器上安装好 Python 的虚拟环境。
反转了,因为阿里云的学生认证方案太弱鸡,一 runserver 就炸了,改用 Azure 的学生认证,Standard D2s v3 (2 vcpu,8 GiB 内存),这个够用了。os 是 Linux (ubuntu 22.04),ubuntu 确实方便,就不要在云服务器上搞什么 debian 了。git clone 也不会出现阿里云那样莫须有的 timeout.
注意要在网络设置中放行需要的端口。
注意访问 公网IP:8000 时关掉梯子,或者配置以下规则(仅示例,并非一定是这个格式):
1 | Rule Type:IP-CIDR |
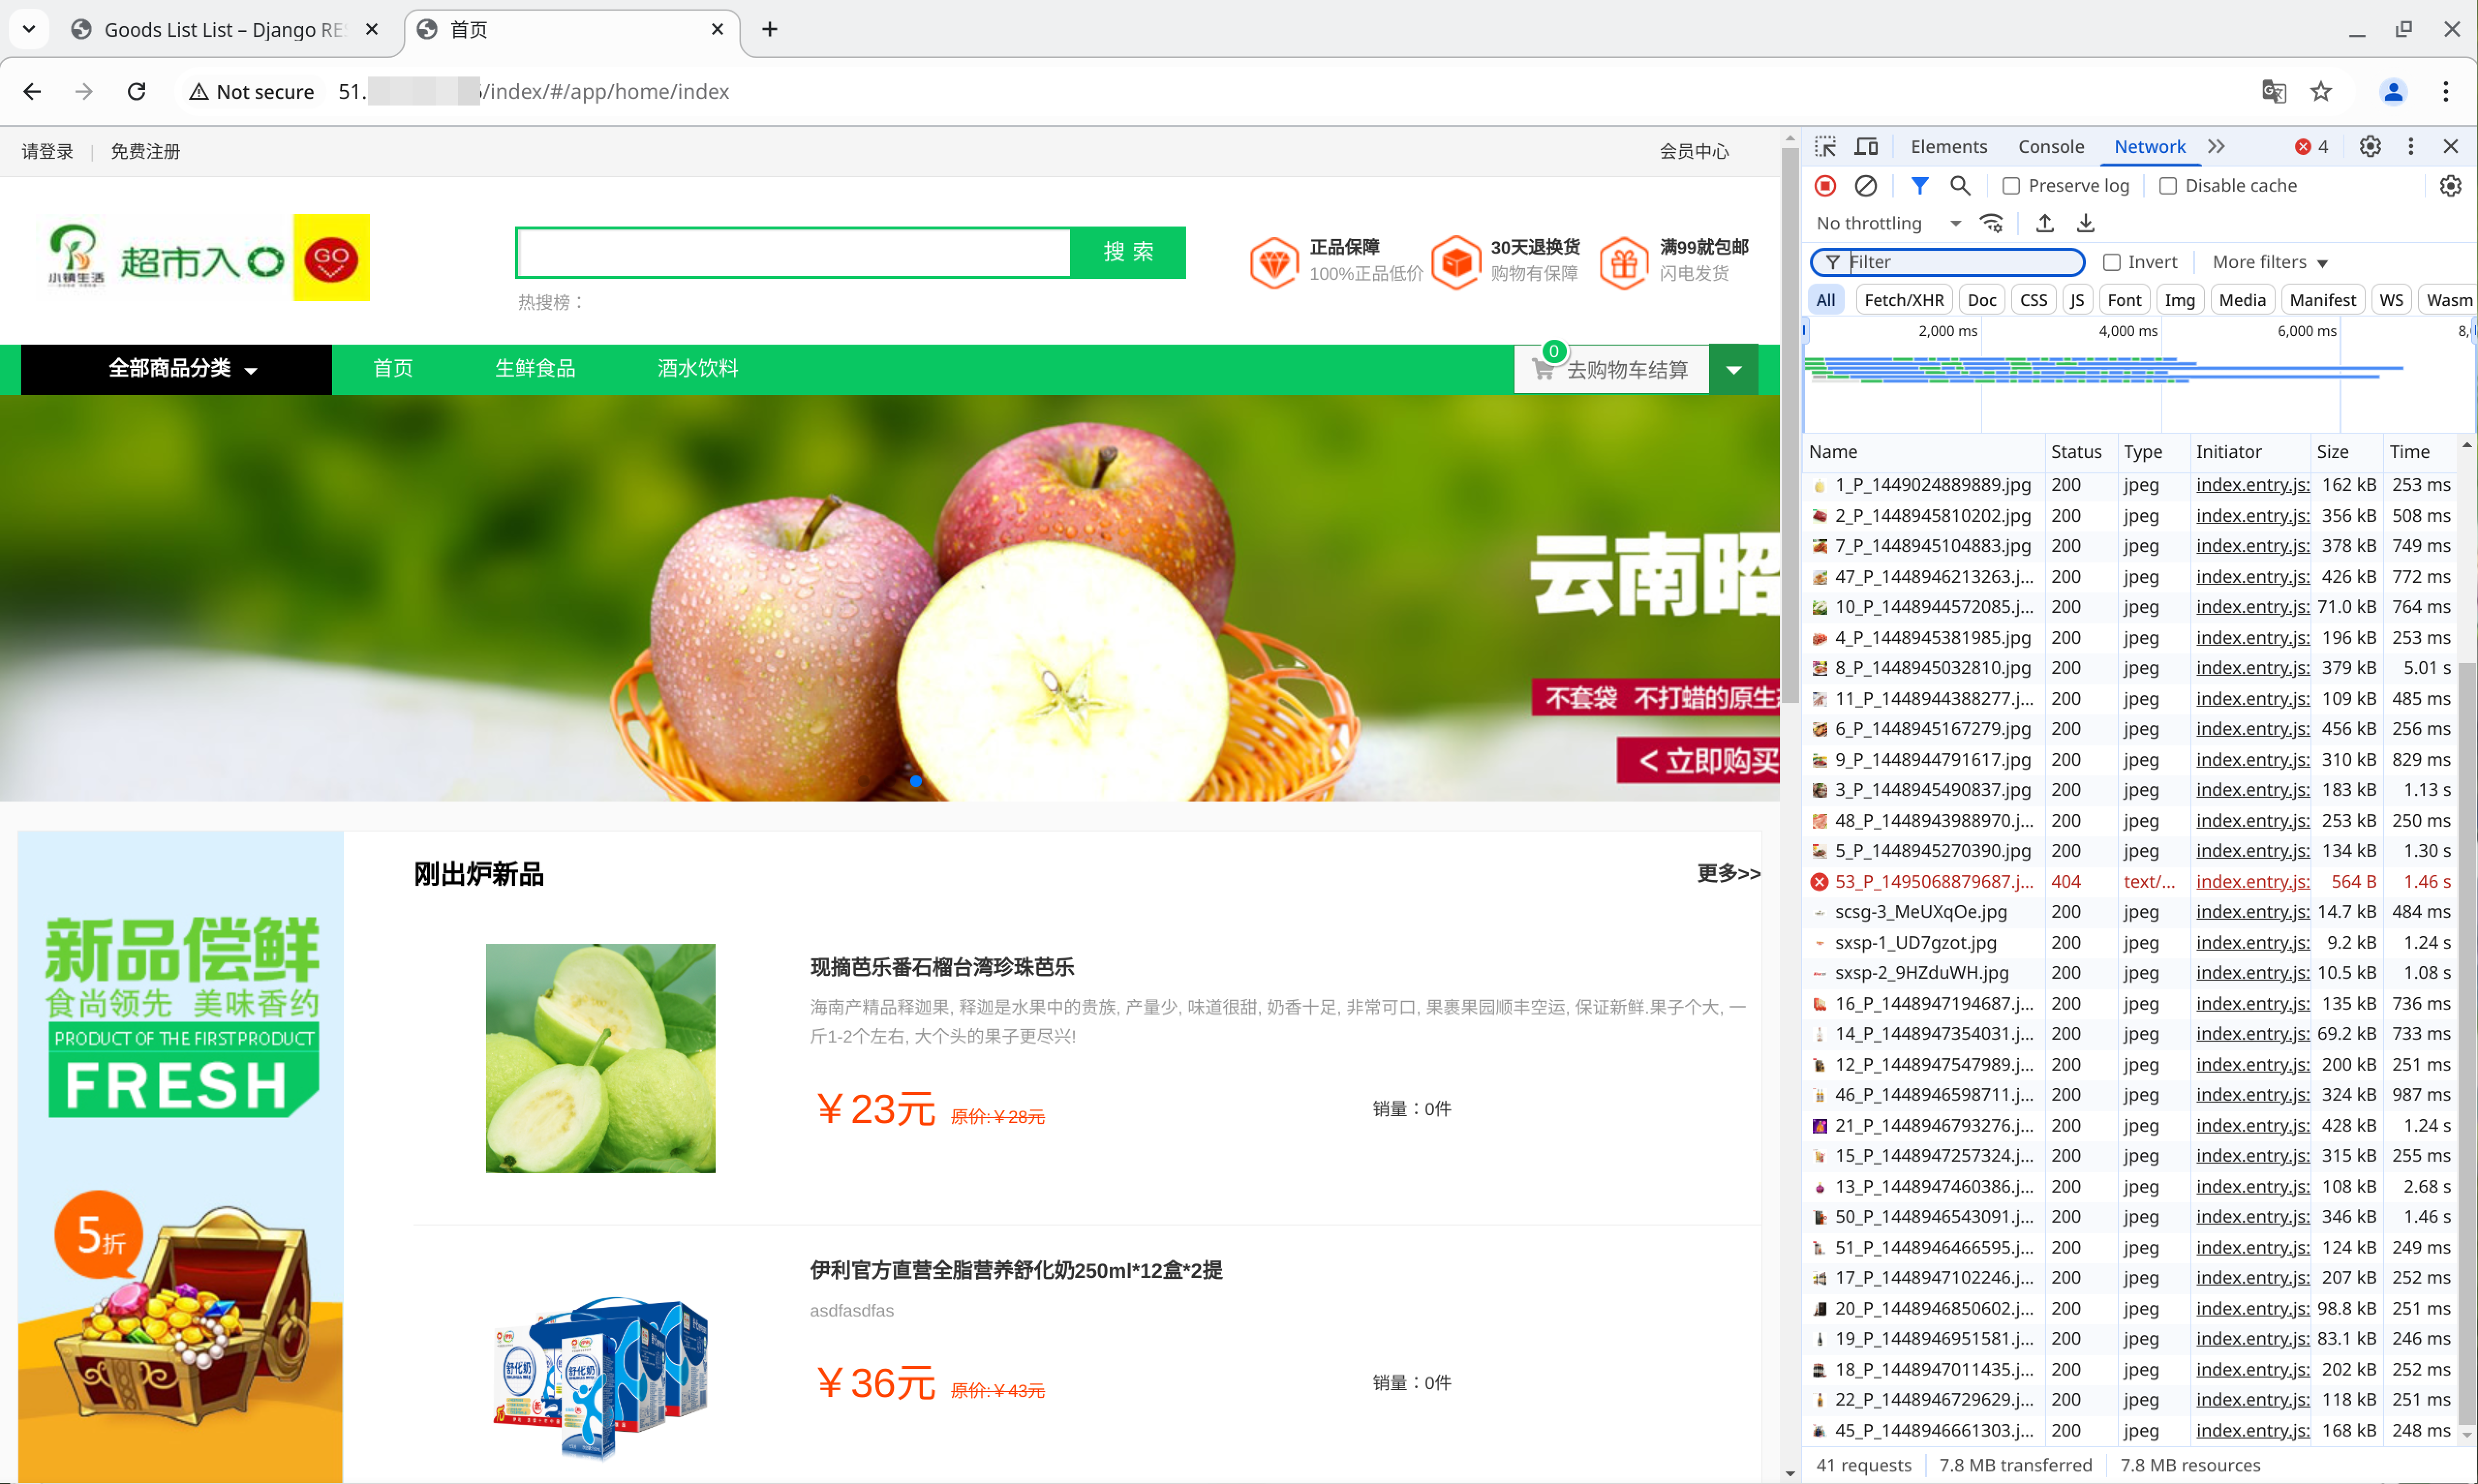
和前端联调时需要在代码中将 IP 地址改为这个云服务器的 IP.
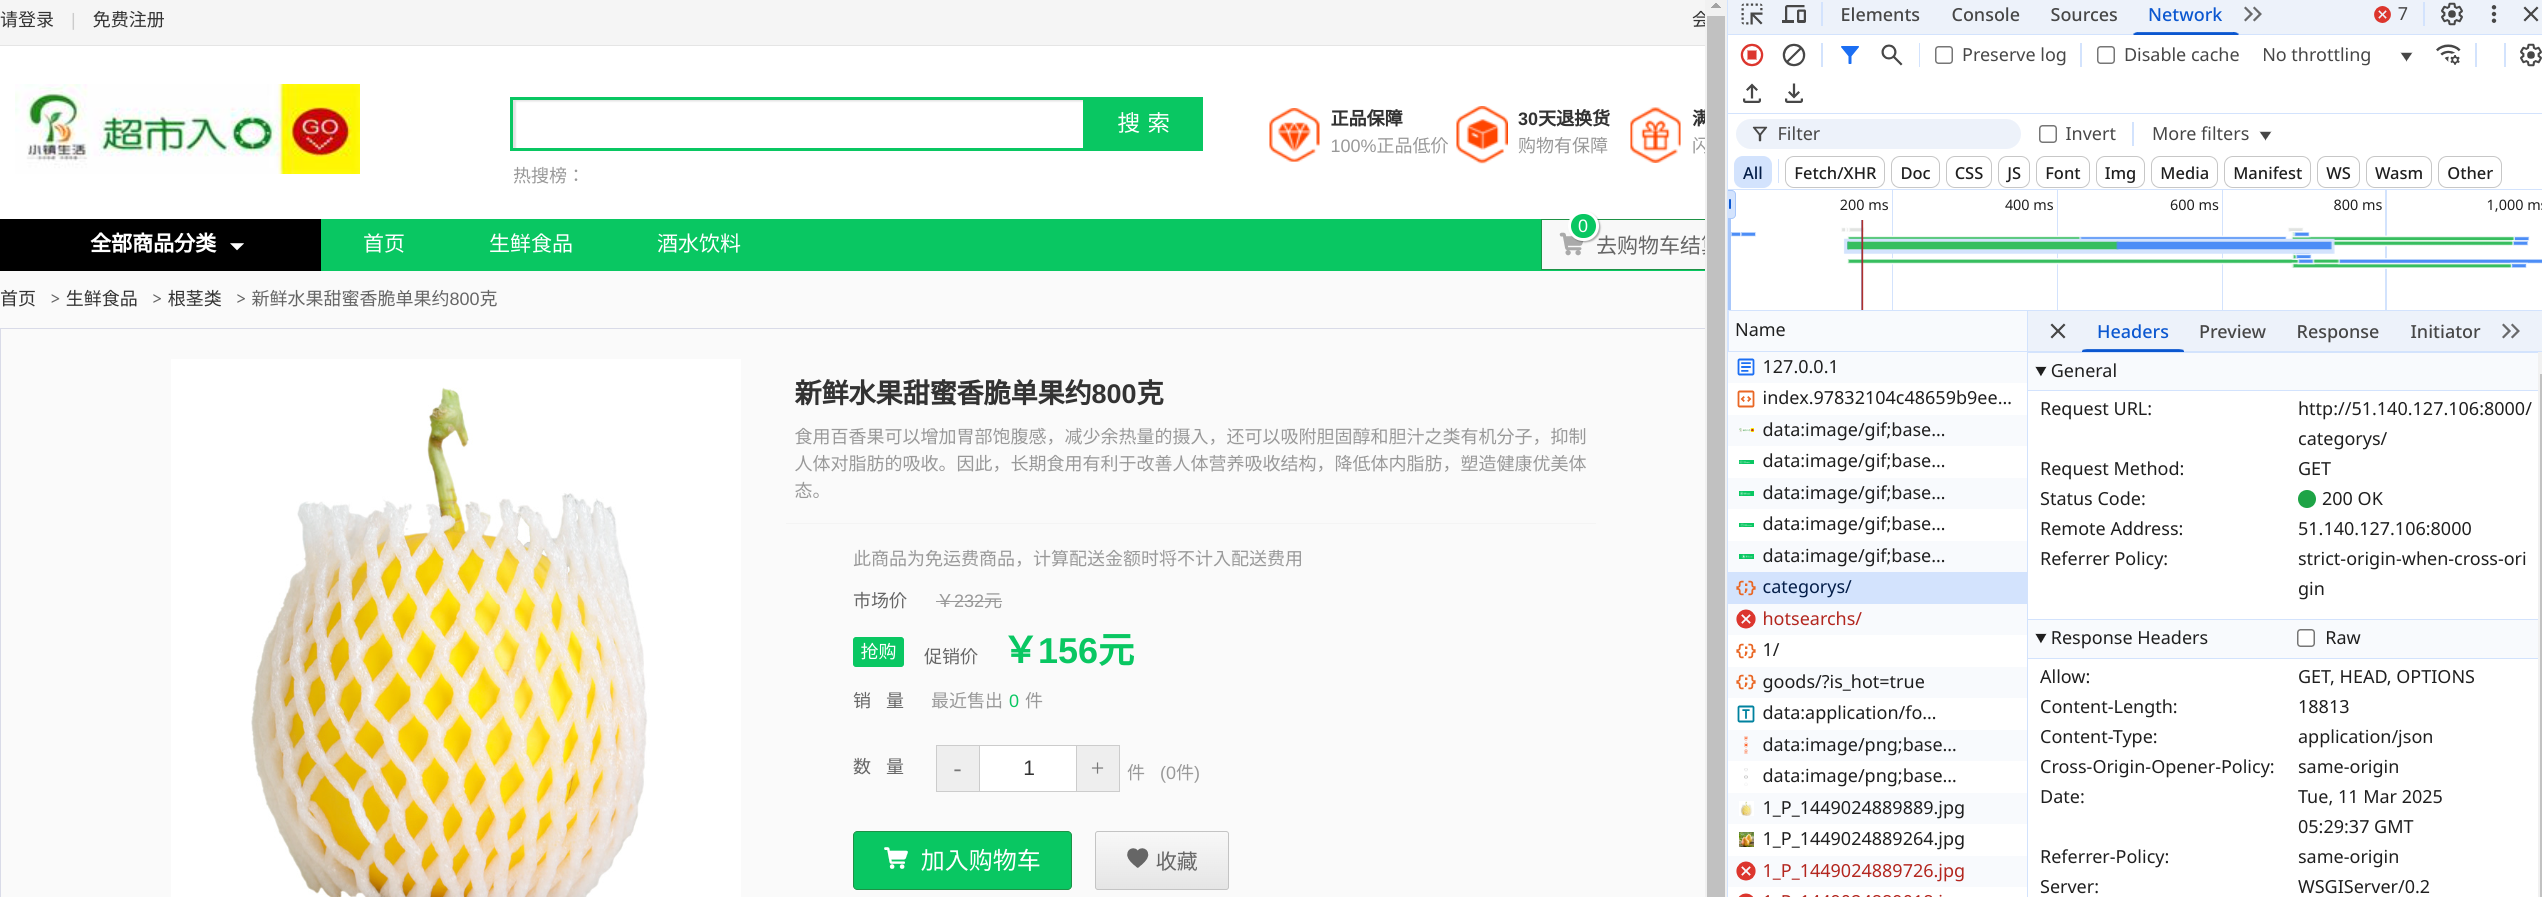
可以看到,请求的地址变成了服务器的 IP.
使用 docker
这是一次失败的尝试,但暂且记录。
docker 安装相关文档:
https://docs.docker.com/engine/install/debian/
docker 相关资料见 实习笔记一 。
在编写完 Dockerfile 后,构建 Docker 镜像:
1 | docker build -t my-drf-app . |
使用 docker save 将镜像保存到文件:
1 | docker save -o my-drf-app.tar my-drf-app |
把这个 .tar 文件上传到云服务器:
1 | scp /path/filename username@serverIp:/path |
然后在云服务器上加载这个镜像:
1 | docker load -i my-drf-app.tar |
最后也尝试了 Docker Compose,但没有成功。
支付宝支付
进入支付宝开放平台,控制台,沙箱。
生成密钥:
https://opendocs.alipay.com/common/02kipl
更多细节参考 ./apps/trade/keys/readme.md .
支付宝 API 文档:
https://opendocs.alipay.com/apis/api_1/alipay.trade.page.pay/
电脑网站支付的支付接口 alipay.trade.page.pay(统一收单下单并支付页面接口)调用时序图如下:
调用流程如下:
- 商家系统调用 alipay.trade.page.pay(统一收单下单并支付页面接口)向支付宝发起支付请求,支付宝对商家请求参数进行校验,而后重新定向至用户登录页面。
- 用户确认支付后,支付宝通过 get 请求 returnUrl(商户入参传入),返回同步返回参数。
- 交易成功后,支付宝通过 post 请求 notifyUrl(商户入参传入),返回异步通知参数。
- 若由于网络等原因,导致商家系统没有收到异步通知,商家可自行调用 alipay.trade.query(统一收单交易查询接口)查询交易以及支付信息(商家也可以直接调用该查询接口,不需要依赖异步通知)。
注意:
- 由于同步返回的不可靠性,支付结果必须以异步通知或查询接口返回为准,不能依赖同步跳转。
- 商家系统接收到异步通知以后,必须通过验签(验证通知中的 sign 参数)来确保支付通知是由支付宝发送的。详细验签规则可查看 异步通知验签。
- 接收到异步通知并验签通过后,请务必核对通知中的 app_id、out_trade_no、total_amount 等参数值是否与请求中的一致,并根据 trade_status 进行后续业务处理。
- 在支付宝端,partnerId 与 out_trade_no 唯一对应一笔单据,商家端保证不同次支付 out_trade_no 不可重复;若重复,支付宝会关联到原单据,基本信息一致的情况下会以原单据为准进行支付。
复用了别人的代码,看起来还挺复杂的,在 ./apps/utils/ 下可以看到。
下面这段代码:
1 | return_url = 'http://'+IP+'/alipay/return/?charset=utf-8&out_trade_n=20241115999&method=alipay.trade.page.pay.return&total_amount=100.00&sign=K1QkuZEX5nQDHzL%2BuCh3chDLesPXWyqmA2Trc5IYbH06jqUfAUle8mezNAFcGld6Lcv4KKXlwAs7a84y3yoYdjl7nxWaxk4sif%2F1DsWT6FvLJQsCjc8hsiE%2BDHLoeaiiHtJ9LsmYDtKyT4vUcg3yA3b3Q%2B4ybejLBQRjlu9r4WtlxO3oaloE880Ujwq4TthnVWzzeWMdIKdacCnnYVI9Fc2H1RdxfTQtRHXEWWW2dCBe5e4BzYOD7i4DQBYPtA4lFM%2FcTY700t0%2B7etjSzC5fS8l%2B6IO3Ea393UWVAvmJkzfYj9wRapai4qMh9KdR%2BEiGsBkXnl7lfXz9o767QQPOA%3D%3D&trade_no=20250515163741149&auth_app_id=2016101400687743&version=1.0&app_id=2016101400687743&sign_type=RSA2&seller_id=2088102179599265×tamp=2019-11-15+17%3A08%3A40' |
urlparse 函数用于解析 URL,并将其分解为各个组成部分。它的返回值是一个 ParseResult 对象,该对象包含以下属性:
scheme: URL 的协议部分(例如 http 或 https)netloc: 网络位置部分(例如 www.example.com)path: URL 的路径部分(例如 /path/to/resource)params: URL 的参数部分(通常很少使用)query: URL 的查询字符串部分(例如 key1=value1&key2=value2)fragment: URL 的片段标识符部分(例如 #section1)
parse_qs 函数用于解析查询字符串,并将其转换为一个字典。字典的键是查询参数的名称,值是一个包含参数值的列表。
一种可能更方便的做法:
https://pypi.org/project/alipay-sdk-python/
上面链接中的代码有 bug, 我已经修了,但是包括之前别人的代码生成的链接,都会遇到 502 Bad Gateway 问题,相关讨论见:
- https://open.alipay.com/portal/forum/post/181001027
- https://open.alipay.com/portal/forum/post/160801014
- https://opendocs.alipay.com/support/01razf
在本文的撰写阶段,支付宝的沙箱可能有点问题,在这个功能上浪费太多时间了,我决定跳过它。
前端部署
在前端项目中,删除 dist 文件夹下的内容。
npm run build 遇到了一些问题,下面是解决方案:
The error is due to the --colors option being removed in newer versions of webpack-cli. You need to remove --colors from your build script. To fix this, update your package.json file and remove the --colors option from the build script. Your updated build script should look like this: webpack --progress --profile --config webpack.prod.js.
此时,仍有新的问题。方案如下:
The error you’re encountering is likely due to an incompatibility between the version of webpack and the configuration or dependencies you’re using. Since you’re using an older version of webpack (^2.5.1), it might be beneficial to update webpack and related dependencies to a more recent version.
Update webpack and webpack-cli to the latest version:
1 | npm install --save-dev webpack webpack-cli |
Ensure all other webpack-related dependencies are compatible with the new version of webpack. You might need to update them as well:
1 | npm install --save-dev webpack-dev-server webpack-dev-middleware webpack-hot-middleware |
After making these changes, try running the build script again:
1 | npm run build |
在后端 settings 中设置:
1 | TEMPLATES = [ |
对生成的 index.html 做一些修改:
1 |
|
在全局 urls 中配置:
1 | from django.views.generic import TemplateView |
注意前端 build 的时候,填写正确的 IP 地址:
1 | // let local_host = 'http://127.0.0.1:8000'; |
缓存
相关资料:
- https://github.com/chibisov/drf-extensions
- https://chibisov.github.io/drf-extensions/docs/
- https://web.archive.org/web/20230327155332/https://www.zmrenwu.com/courses/django-rest-framework-tutorial/materials/102/
使用 redis.
1 | pip install drf-extensions |
修改部分代码:
1 | from rest_framework_extensions.cache.mixins import CacheResponseMixin |
安装 redis-server:
1 | sudo apt install redis-server |
在 settings 中配置:
1 | REST_FRAMEWORK_EXTENSIONS = { |
本地 runserver, 访问两个链接:
- http://127.0.0.1:8000/goods/
- http://127.0.0.1:8000/goods/?min_price=&max_price=&name=&is_hot=true&is_new=
可以在 redis-cli 里看到:
1 | 127.0.0.1:6379> keys * |
第三方登录
大致原理:
微博开放平台的相关文档:
https://open.weibo.com/wiki/%E7%BD%91%E7%AB%99%E6%8E%A5%E5%85%A5%E4%BB%8B%E7%BB%8D
开放平台的审核大约两天左右。
填写授权回调页:
应用还未通过审核时,不能大范围推广。可以设置测试帐号来测试尚在开发中的应用。添加自己的微博账号即可。
Oauth2.0 相关文档:
https://open.weibo.com/wiki/Oauth2/authorize
实验
在 ./apps/utils/weibo_login.py 中,我写了一些代码以实验微博登录的流程。
调用 get_auth_url() 函数以获取链接。可能会遇到 21322 重定向地址不匹配问题,原因是授权回调页面的 url 最后少了一个 /,加上即可。
点击这个链接,注意需要事先退出所有微博帐号(其实开个隐私标签页就行了),会进入微博的登录界面。
登录(扫码)后,我们可以得到一个链接:
1 | http://云服务器IP:8000/complete/weibo/?code=c和谐b |
将这个 code 的值填入 ./apps/utils/weibo_login.py 的 get_access_token() 函数的形参中。
运行 get_access_token() 函数,得到 access_token, 即可通过 access_token 去使用微博的 API 接口:
实际上我们只关心这个部分:
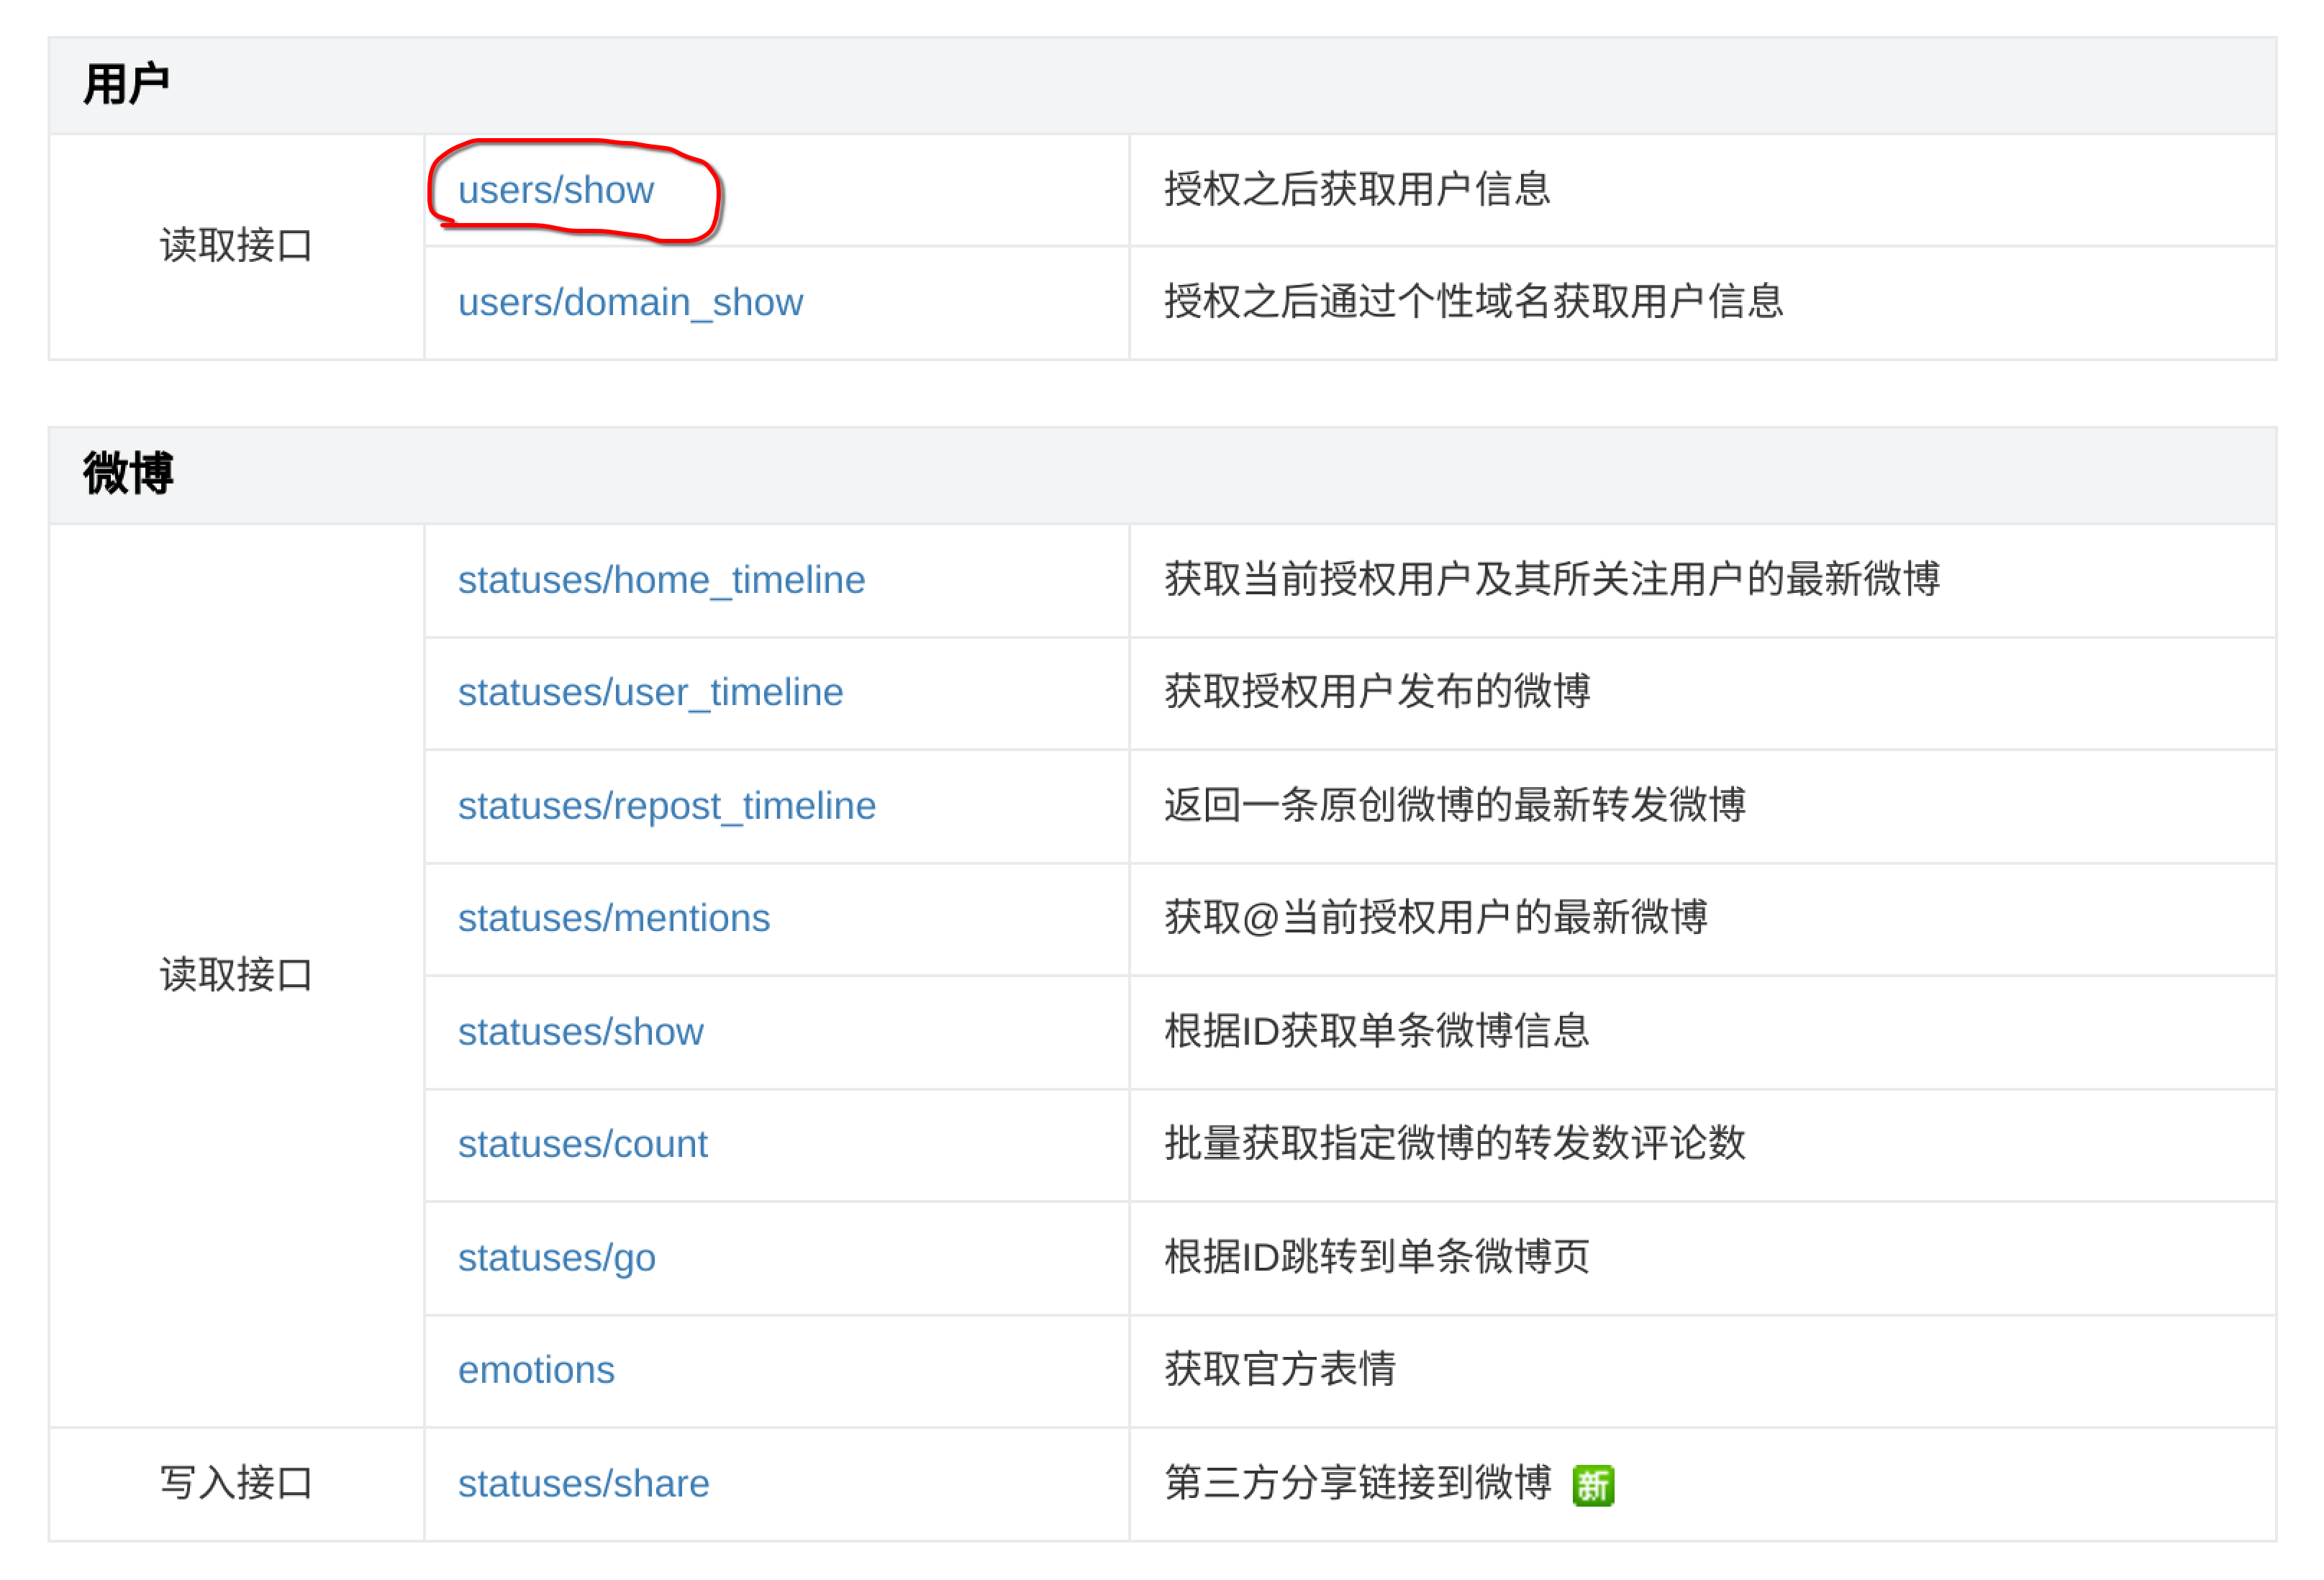
将 access_token 和 uid 的值填入 ./apps/utils/weibo_login.py 的 get_user_info() 函数的形参中。运行得到一个链接,浏览器打开可以看到类似下面的输出:
1 | { |
最后要做的就是给用户在我们的应用中注册一个 id,然后和用户的微博 id 绑定。至此实验结束。
开源第三方登录解决方案
就是文章开头提到的 social-core .
注意需要:
1 | pip install social-auth-app-django |
然后在 settings 中 INSTALLED_APPS 增加对应内容。
在 settings 中增加:
1 | AUTHENTICATION_BACKENDS = ( # 只要满足一个即可 |
在全局 urls 中增加:
1 | urlpatterns = [ |
在全局 settings 中增加:
1 | TEMPLATES = [ |
注意跳转到微博那边登录的时候,如果出现错误,可以尝试清空(临时的非安全的)浏览器缓存。
扫码跳转后遇到报错:
1 | File "/home/azureuser/shopvenv/lib/python3.11/site-packages/social_core/utils.py", line 235, in wrapper |
这(可能?)是由于 social_core 使用 session 认证,和我们的 JWT 不一致,我们复制一份 social_core 到 extra_apps, 然后修改 ./extra_apps/social_core/actions.py 源码:
1 | # 无法确定这段代码是否发挥了我期望它发挥的功能 |
修改 ./extra_apps/social_core/backends/oauth.py 中的 validate_state 函数:
1 | # 无法确定这个改动是否真的有效。改动的第一天不行,第二天什么都没做就可以正常运行了 |
日志框架 sentry
注册 sentry 账户: https://sentry.io/signup/
Install sentry-sdk from PyPI with the django extra:
1 | pip install --upgrade 'sentry-sdk[django]' |
Initialize the Sentry SDK in your Django settings.py file:
1 | import sentry_sdk |
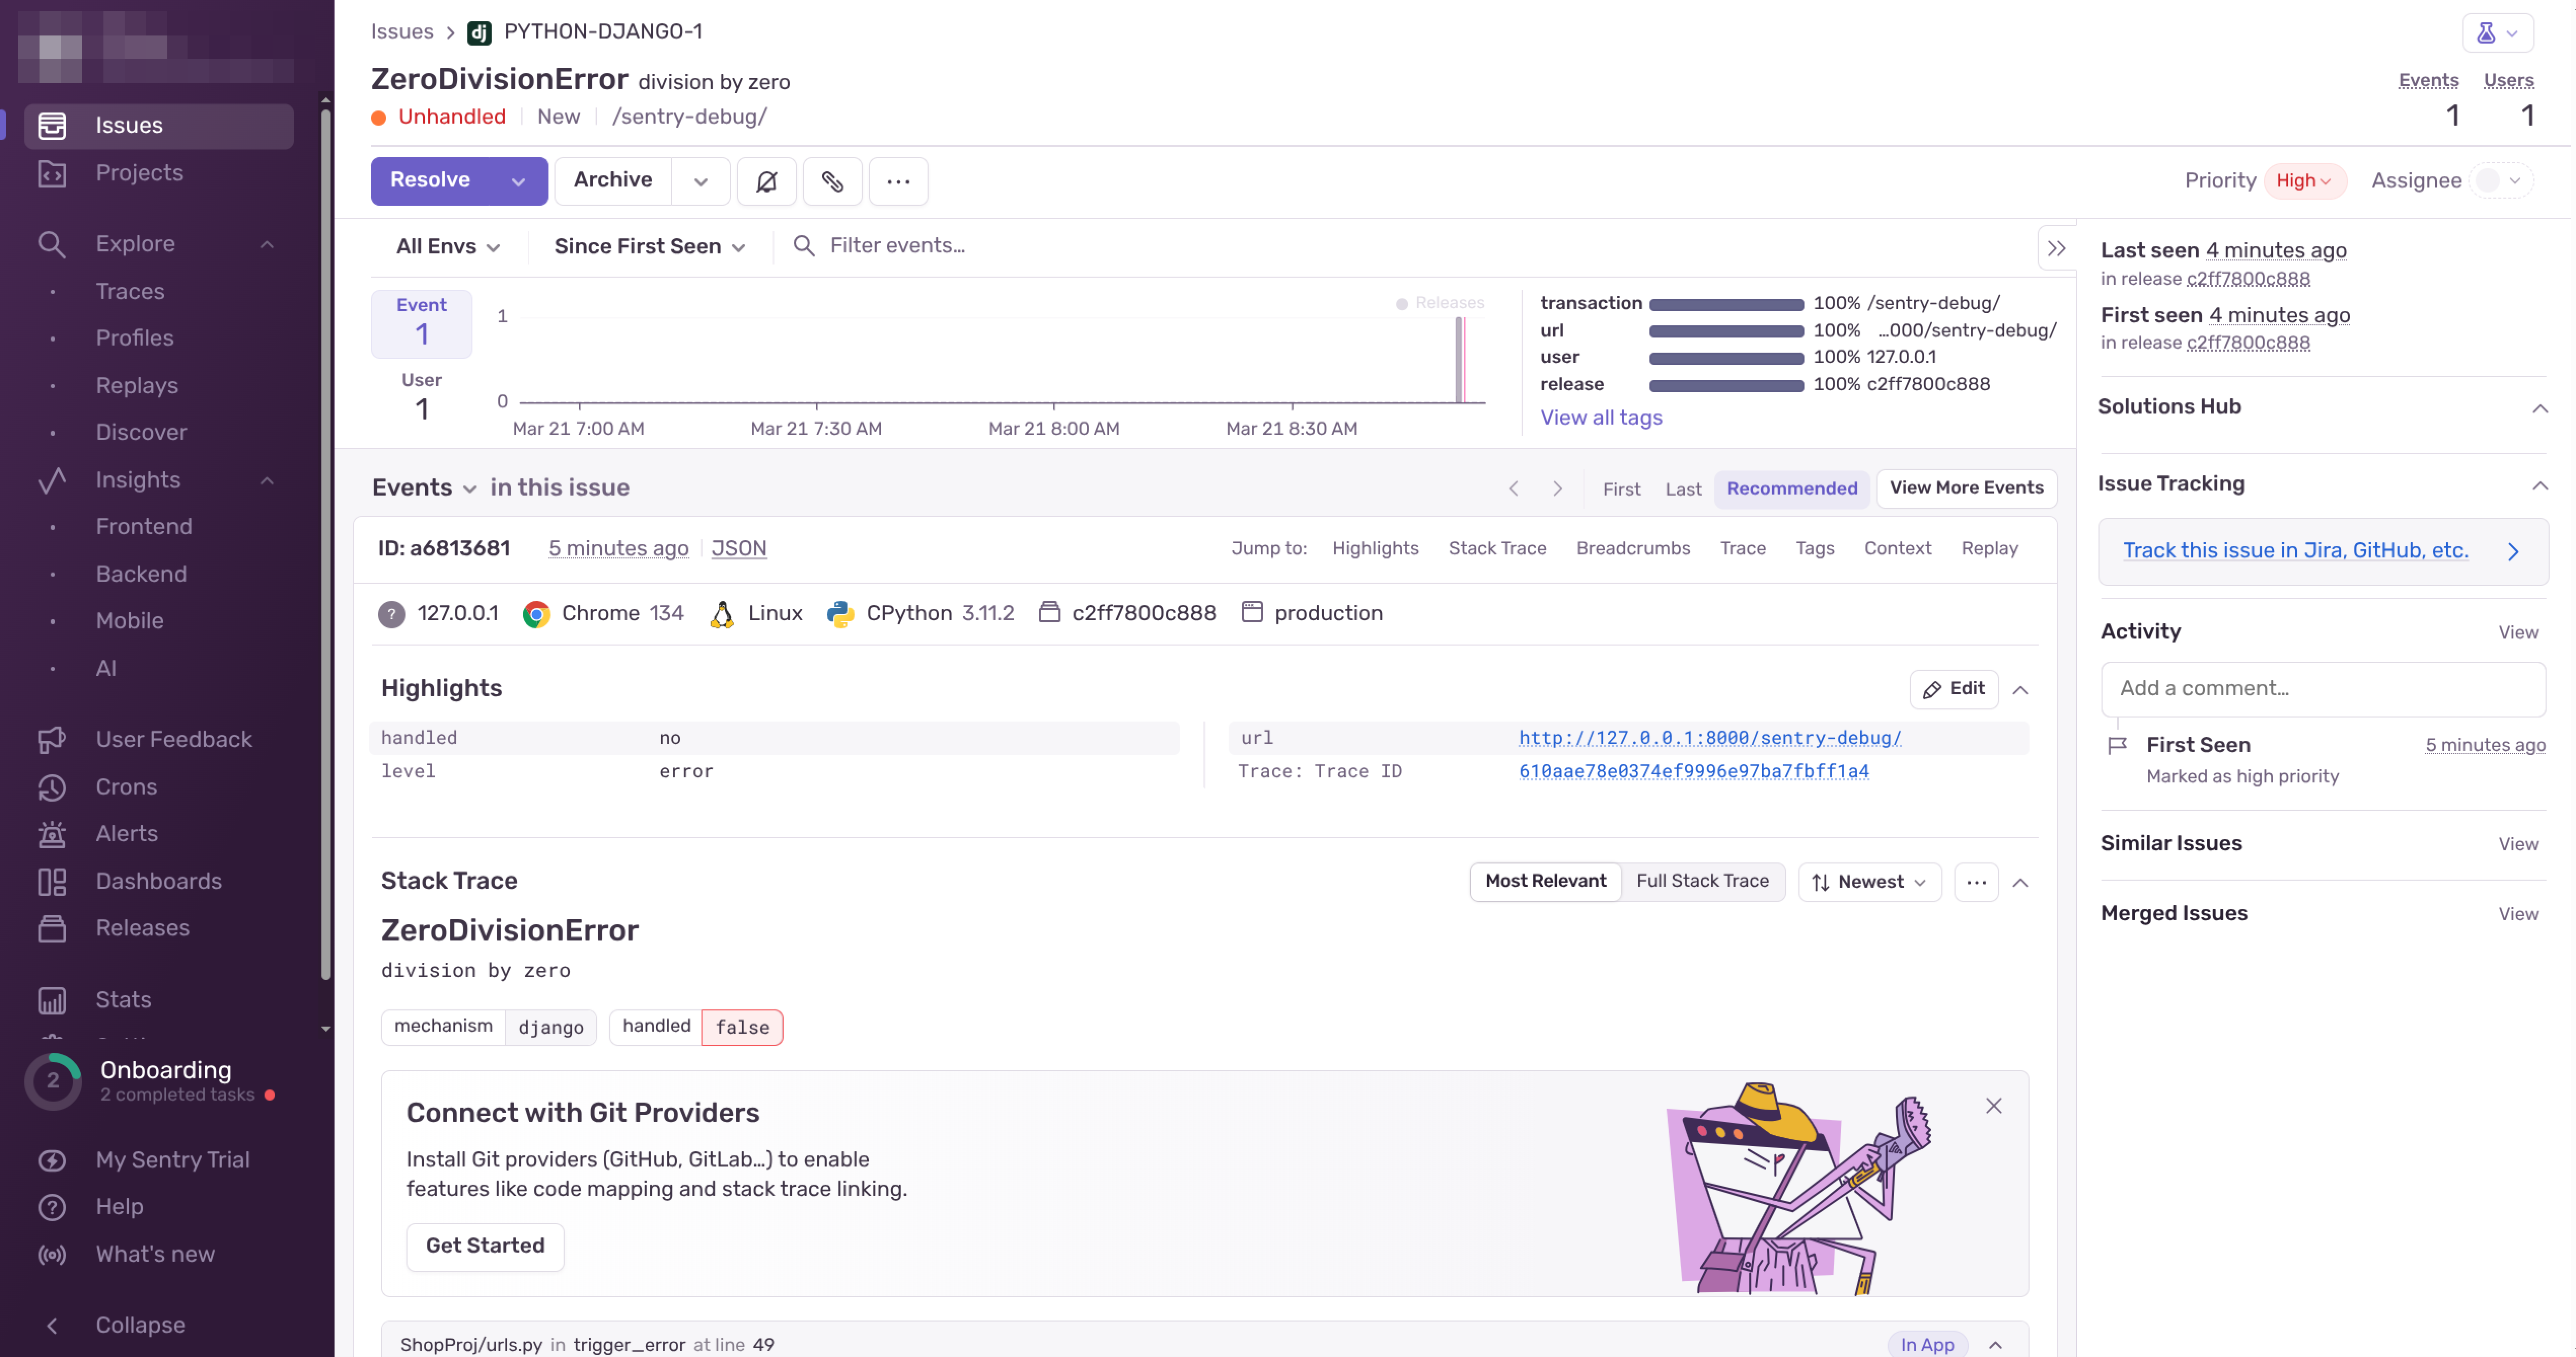
You can easily verify your Sentry installation by creating a route that triggers an error:
1 | from django.urls import path |
一些相关的文档:
https://docs.sentry.io/platforms/python/integrations/django/
引发错误后,可以看到管理界面:
在后端使用 localhost 8000 端口测试时,可以正常收到邮件提醒。
部署
部署部分的代码和资料,在 github 仓库的分支 deploy_version 上。
安装 nginx
查看 nginx 是否已经安装:
1 | azureuser@2v8g-ubuntu2204:~$ ps -elf|grep nginx |
安装:
1 | sudo apt install nginx |
安装过程中可能需要重启一些服务:
1 | 1. packagekit.service 2. ssh.service 3. none of the above |
在提示符下输入 1,然后回车,让 debconf 只重启 packagekit.service,然后手动重启 ssh.service,确保不会影响 SSH 连接。
安装 uwsgi
在 Auzre 服务器中安装,注意要安装到虚拟环境中。
1 | pip install uwsgi |
开始部署
注意 settings 文件中的改动。
将 debug 设为 False.
增加:
1 | STATIC_ROOT = os.path.join(BASE_DIR, "static/") |
将 settings 中的跨域去除。
将前端代码中的端口号去除。
前端代码重新 build, 相关静态资源放入对应的后端文件夹。
执行:
1 | python3 manage.py collectstatic |
报错:
1 | SystemCheckError: System check identified some issues: |
相关讨论:
https://www.reddit.com/r/django/comments/1529l15/learning_django/
You should think of the
STATICFILES_DIRSsetting as a list of sources thatcollectstaticwill scan, and from which it will copy your static files.You can think of STATIC_ROOT as the destination where
collectstaticwill copy your static files to for serving.If you list the destination as one of the sources, it would either overwrite your files, or generally make a massive mess, so Django raises an error.
Typically, you would want to set
STATIC_ROOTto a directory that a web browser would serve (/srv/http/static/or/var/www/static/) and use Nginx, Apache, etc. to serve them.Edit: original phrasing sounded too condescending to me, and that was not my intention. Hard to not sound too dry over text sometimes.
解决方案:
Just change STATIC_ROOT = BASE_DIR / ‘staticfiles’
在 settings 中作相关改动即可。
然后把原有的 static 文件夹删除,将 staticfiles 改名为 static.
找到 nginx:
1 | which nginx |
执行:
1 | sudo nginx -c /home/azureuser/tiny-shop/mynginx.conf |
上面的指令,如果缺少相关文件,创建之;如果有报错,可以丢给 AI.
在虚拟环境中执行:
1 | uwsgi --ini /home/azureuser/tiny-shop/uwsgi.ini |
查看是否成功:
1 | azureuser@2v8g-ubuntu2204:~$ ps -elf|grep uwsgi |
或者在日志中查看亦可。
若发现代码有些错误,需要更改,那么更改之后,就要重新启动 uwsgi.
在云端部署成功:
遗留了一个 bug, 本地运行前后端分离的项目时正常,但是部署到云端缺少 cookie. 尝试了一些方法,没什么思路。这个 bug 会导致在访问网页时的鉴权问题。
杂项及后记
关于 lookup_field:
https://www.django-rest-framework.org/api-guide/generic-views/#api-reference
个人感觉和 fastapi 相比,drf 完全是不同的思路,fastapi 更加直观。drf 除了思路不同,还有很多混乱的地方。
一些 pip install 的东西有点随便,导致开发的时候踩坑。点名 djangorestframework-simplejwt,其 github issues 可以看到一些未解决的 bug. 鉴权是个相当麻烦的事情,至少我为了用 JWT 强行上 simplejwt, 同时保留了部分其他认证方式导致了这个局面。
一些让 AI 干活的证据:
16G 内存真的不够用啦:
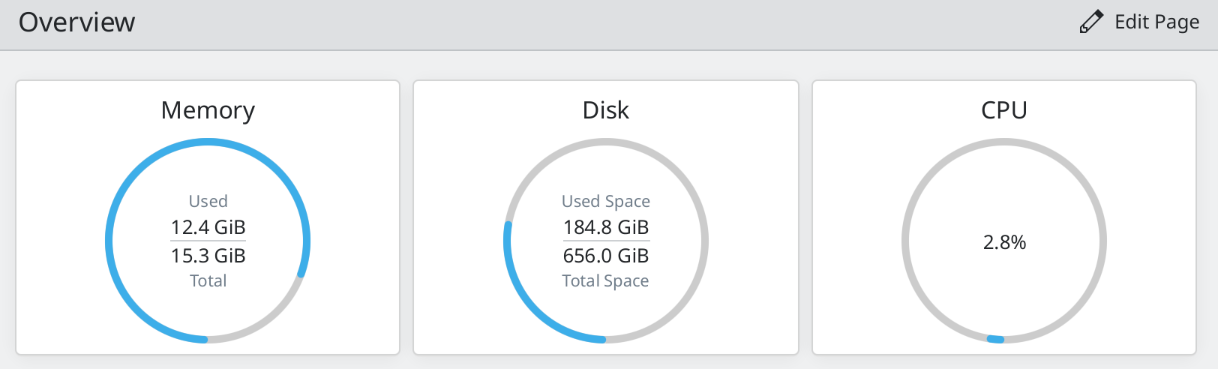
这还是 debian 勉强能够用,要是 win11 早就炸了。
相比之前实习的项目来说,这种简单的前后端项目,models 和主要的代码逻辑反而是最好写的。但是其他各种各样的细节会淹没人的精力,浪费大量时间,提升却有限,以后还是少接触。
不过也并不是一无所获。在公司实习好像一个流水线上的工人,我只对我负责的那一部分有所了解,其他环节则十分茫然。这种项目反而在一定程度上建立了全局观。
 Thanks ᗜ ‸ ᗜ
- ₍ᐢ.ˬ.⑅ᐢ₎